|
|
|
|
There are two standard version of the stimulator available. Until July, 2006, all stimulators were of the version 1 or version 2 variety, with minor differences between them. In July, 2006, the version 2.1 stimulator has become available with a few key differences. The V1 & V2 version s have 4 LEDs, the V2.1 version has 5 LEDs. This page documents the v2 configuration. To read about the V2.1 version, follow this link.
| CLT | 10k pot, black body |
| IAT | 10k pot, black body |
| O2 | 10k pot, black body |
| TPS | 10k pot, black body |
| RPMC | 1M pot, green body |
| RPMF | 50k pot, black body, marked 50k |
| C1 | 0.01 µF, cap |
| C3 | 0.33 µF, cap |
| C4 | 0.01 µF, cap |
| R1 | 330 ohm resistor, 1/8 or 1/4W, orange orange brown |
| R2 | 33k ohm resistor, 1/4W, orange orange orange |
| R3 | 1.0k ohm resistor, 1/4W, brown black red |
| R4 | 1.3k ohm resistor, 1/4 W, brown orange red |
| R5 | 330 ohm resistor, 1/8 or 1/4W, orange orange brown |
| R6 | 330 ohm resistor, 1/8 or 1/4W, orange orange brown |
| R7 | 330 ohm resistor, 1/8 or 1/4W, orange orange brown |
| R8 | 1.0k ohm resistor, 1/4W, brown black red |
| R9 | 100 ohm resistor, 1/2W, brown black brown or 390 ohm resistor, 1/2W, orange white brown |
| IC1 | LM555CN timer IC |
| T1 | PN2222A NPN transistor |
| D1 | red LED, fuel pump circuit indicator |
| D2 | red LED, injector circuit 2 indicator |
| D3 | red LED, injector circuit 1 indicator |
| D4 | red LED, fast idle circuit indicator |
| F37 | female DB37 connector |
| 9V battery holder | |
| 9V battery clip | |
| 2 position terminal block | power input |
1. Install and solder the DB37 female connector to the PCB. Be sure to get the correct connector on the stim and MegaSquirt. Do not mix them up. Do NOT use gender changers to 'fix' incorrect connectors - it WON'T work!
2. Install and solder the LEDs. When looking at the LED from the top, with the flat facing to the right, the short lead is also on the right. Install the short lead so that it is in the hole closest the DB37 connector, and the long lead is on the left (towards RPMC). The LED leads may be tight in the PCB, this is okay - but use caution when inserting them. Needle nose pliers can help with this.
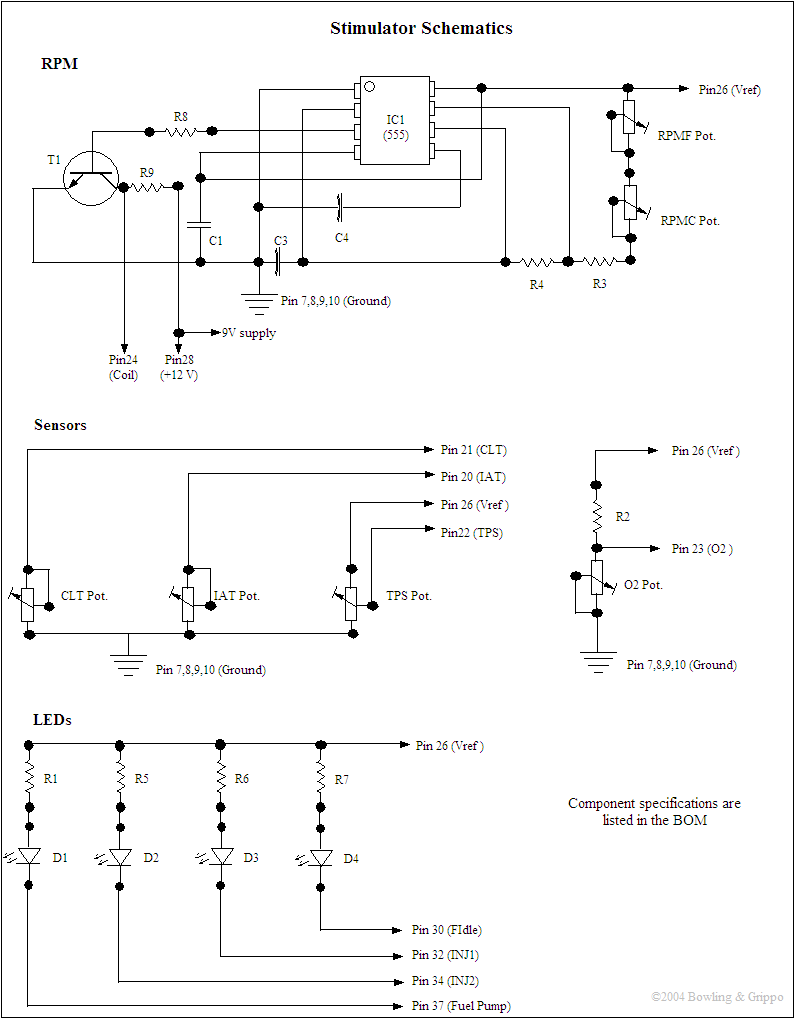
3. Install and solder the potentiometers (a.k.a. "pot"). The RPM circuit has both a coarse and fine control. The combination of the 1M (RPMC) and 50k (RPMF) pots allows precise setting of rpm. Note that the PCB is marked "10K" on both the RPMF and RPMC pot locations, but this is an error. Do not use 10k pots in these locations. Use the 1M pot for RPMC, and the 50k pot for RPMF. The 10k and 50k pots look identical, however if you look closely on the bodies, you will find a 10k or 50k marking.
4. Install and solder all the capacitors in their respective locations as marked on the PCB. You can use the Digi-Key parts list to identify the capacitors, or use the guide below to decipher the markings:
Capacitor Identification |
Capacitors may be marked directly with their capacitance. If not, they are frequently marked with numbers like: 104 K50 or 152 K100 The first two numbers are multiplied by ten to the power of the third number to getting the picofarad capacitance. For example, since 10 to the fourth power is 104 = 10 x 10 x 10 x 10 = 10,000, the first capacitor would be 10*10,000 = 100,000pF = 0.1µF, , since 1,000,000pF = 1µF, . The second capacitor would be 15 x 102 = 15 x 100 = 1500pF = .0015µF,. The upper case letter indicates the tolerance, M = 20%, K = 10%, J = 5%, H = 2.5% and F = ± 1pF. The last numbers are the rated voltage, 50 and 100 volts in these cases. |
5. Install and solder all the resistors in their respective locations as marked on the PCB. Note: be careful to space R9 above the PCB by 1/4 to 3/8 inch (7mm to 10mm). This resistor can get very hot (255°F, 124°C) in use, and spacing it up allows it to cool better and protects the PCB from excess heat. The other resistors don't get hot, and can be flush with the PCB. The resistor color band coding is as above, or you can use the chart below, and it is a good practice to verify each resistor's value with a multimeter before installing it.
| Resistor Band Color Reference |
|||||
| Color |
Band 1 |
Band 2 |
Multiplier |
Tolerance |
|
| Black | 0 | 0 | x 1 | not used | |
| Brown | 1 | 1 | x 10 | not used | |
| Red | 2 | 2 | x 100 | not used | |
| Orange | 3 | 3 | x 1000 = 1K | not used | |
| Yellow | 4 | 4 | x 10000 = 10K | not used | |
| Green | 5 | 5 | x 100000 = 100K | not used | |
| Blue | 6 | 6 | x 1000000 = 1M | not use | |
| Violet | 7 | 7 | not used | not used | |
| Gray | 8 | 8 | not used | not used | |
| White | 9 | 9 | not used | not used | |
| Gold | not used | not used | divide by 10 | ±5% | |
| Silver | not used | not used | divide by 100 | ±10% | |
| None | not used | not used | not used | ±20% | |
For example, this resistor:
| band1 | band2 | multiplier | tolerance | |||||||
Is 4.7K Ohms, since band1 is yellow=4, band 2 is violet=7, and the multiplier is red= ×100, so we have 47×100 = 4,700 Ohms = 4.7K Ohms. The tolerance is ±10%. Note that you start reading at the end furthest from the gold or silver band.
6. Install and solder the battery terminal block, and attach the battery clip and holder. Pay attention to the polarity of the battery leads. Verify that the lead you connect to the positive terminal (+) is the positive lead from the battery using a voltmeter. Use the double sided tape to attach the battery clip to the PCB.
7. Install and solder the transistor (use the diagram in the MegaSquirt® controller assembly manual [step 62]) to see how the leads should be arranged if you have the 'Digi-Key' transistor - the flat side should face the TPS pot).
8. Install the 555 IC in its locations as marked on the PCB. Pay careful attention to the orientation. The notch (and/or dot) on the chip goes at the end closest to C1.
Note: if you are planning on using a wide-band oxygen controller/sensor with MegaSquirt® EFI Controller, you may want to modify your stimulator as shown in Eliot Mansfield's instructions here:
Connection of the stimulator directly to your MegaSquirt® controller can be made by removing the faceplate on the DB37 connector (Not all connectors will need the faceplate removed, check first). Otherwise, use an appropriate cable.
Note: Although there is a 9V battery clip and holder, this should only be used for quick checkout of the MegaSquirt. For extended use, an external 12V supply is recommended. You can use the 'wall-wart' style AC/DC adapter from discarded household electronics if it has a 9 to 12 DC Volts at 300 to 750 milliAmps DC output. The adaptor will be labeled something like OUTPUT: VDC 300mA. To use this, cut the end off the cord, strip the insulation off the ends, and use a multimeter to find which lead is positive, and which is negative, screw them into the terminal block on the stim, taking care to get the polarity correct.
The stimulator power supply goes directly to MegaSquirt® EFI Controller, which returns 5V power the stimulators circuits. The stimulator will not operate independently so there is no need to disconnect the battery after each session to avoid discharge.
Understanding the MegaStimulator
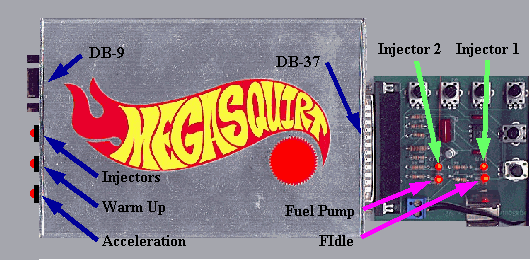
There are 4 LEDs on the Stimulator, and 3 on the MegaSquirt. On the Stimulator, the 4 LEDs are:
On the MegaSquirt® EFI Controller, there are three LEDs, which are:
Note that these LEDs all do separate things.
The Injector LED on the MegaSquirt® controller lights when either Injector bank is commanded to fire, while the injector LEDs on the Stimulator light when each injector bank actually is grounded. The MegaSquirt® controller LED will flash synchronously with the Stimulator Injector LEDs in simultaneous mode, and will flash twice as fast as either LED in alternating mode.
The Warm-up Enrichment values are separate entries in the software from the Fast Idle Threshold value, so these two LEDs will generally light at different, though similar, coolant temperatures.
The Fuel Pump LED is light whenever the fuel pump relay is grounded. Since the Stimulator puts out about 1 pulse per second minimum, and the MegaSquirt® controller leaves the pump on for 2 seconds after the last ignition event, the fuel pump LED should be light whenever the Stimulator is plugged into the MegaSquirt® controller.
By using these LEDs, and adjusting the RPM, coolant and air temperature, EGO, and throttle potentiometers on the MegaStimulator, while viewing the TunerStudio tuning software, you ought to be able to test every function of your MegaSquirt® EFI Controller, except MAP function [for which you can suck and blow].
Note that the stim generally only allows you to turn the MegaSquirt temperatures down to ~30°F or so (because of it's particular electrical design), and if you turn the pot all the other way around, you'll get 170°F. However this is the 'fault mode', which defaults to 170° when the sensor is shorted to ground. If you turn the pot back a bit, you should be able to get readings of at least 215°F in TunerStudio.