- Realtime Display
The realtime display (sometimes called the 'runtime display') shows the values of the tuning and
control parameters inside the MegaSquirt® controller in real time.
Time (s)
Time in seconds since MegaSquirt® last booted ("secl"). This value is derived from the 8-bit
seconds value in the internal MS clock, and will therefore only display
values from 0 to 255 (it wraps around to zero when it hits 255). If
the time wraps around before hitting 255, a reset has occurred, and this
will be noted on the front page status bar. Note that with MegaSquirt-II, the datalogs will show secl continuing to climb above 255 (up to 65536), this is normal.
Barometer (kPa and
in/Hg)
The barometric pressure as measured by
MegaSquirt. Currently this is a static value determined at startup.
Returned by MegaSquirt® in "baro" as a raw ADC count.
O2 (v)
This is the voltage detected on the EGO sensor if on
is installed. For narrow band sensors this ranges from 0-1 v and typical
wideband sensors have a voltage range of 0-5 v.
Coolant (F)
The value reported by the coolant temperature sensor. By default, it has a maximum of 215°.
Batt (v)
Current battery voltage as measured inside
MegaSquirt. If this number looks lower than actual battery voltage
(probably 14.0 v or higher), then you may not have big enough wires
running to MS; put a voltmeter across the wires from the board to their
source in your vehicle's wiring loom (should be less that 1 v, a lot
less). Returned from MS as a raw ADC count in "batt."
TPS (v)
Throttle position in volts. Most TPSs don't range
all the way from 0 to 5 v, so don't be alarmed if yours only goes from 1.5 to 4.4 Volts as
this is normal. The nominal TPS value itself is generally not interpreted
in an absolute way, but rather the rate of change in TPS is what is used
for acceleration enrichment. However the value of ~3.5 volts is used
to denote "flood clear" mode; i.e., if you hold the throttle down past the
3.5 volt level (the voltage from the TPS) when cranking, the pulse width is cut back to 0.3
milliseconds. Returned from MS as the variable "tps" in a raw ADC count.
GammaE
Gamma is the total enrichment factor, computed by
MegaSquirt® taking into account all of warmup, acceleration/deceleration,
barometric, and manifold air temperature sensor correction factors, but excluding EGO correction, which is handled separately
(See Corrections/Enrichments, below.) Returned from MS as a percentage
value in "gammae".
MAP (kPa)
The manifold absolute pressure as seen by MegaSquirt®
in kiloPascals. Returned in MegaSquirt® "map"
as a raw ADC count, converted in TunerStudioMS using a hard-coded transfer
function.
MAT (F)
The raw temperature of the air at the Manifold Air
Temperature sensor. Used in conjunction with MAP to compute manifold air
density. (See note on Coolant temp, above.) Returned by MegaSquirt® in "mat" as a raw ADC count.
RPM
Engine speed in RPM. If this is jumping around in an
unpredictable manner, you probably have a poor ignition signal input to
MegaSquirt. It is returned from MS as RPM/100 in the variable "rpm."
Pulse Width (ms)
The injector pulse width being used by MegaSquirt® to
squirt fuel into your motor. Reported as 10xPulse width in the MegaSquirt®
variable "pw".
IAC DC (%)
If a PWM Idle valve is selected, this is reporting
the PWM percentage applied to the valve (0 to 100%). If a stepper motor
IAC is selected, it reports the total number of steps made to extend the
pintle, with 0 being the start value.
Corrections/Enrichments (percent)
This part of the realtime display shows all the
individual correction factors used to compute gamma and the resulting
pulse width.
EGO
This is the correction factor computed from O2 sensor
readings. Returned as a percentage by MS in "egocorr". See "Exhaust Gas Oxygen" on the
Enrichments page, below, for parameters to modify MegaSquirt's computation
of this factor.
Barometer
A barometric correction is applied, based on the
initial MAP sensor reading. Returned in "barocor" by MegaSquirt.
Warmup
The warmup
correction factor applied due to startup and coolant temperature status.
Returned in "warmocor" by MegaSquirt. See
"Warmup Enrichment Bins" to modify the computation of this factor.
Air Density
Air density correction is computed from MAT. This
value is returned from MegaSquirt® in "aircor".
Volumetric
Efficiency
The current computed VE value
determined by look up in the VETABLE using RPM and MAP. Reported in "vecurr" by MegaSquirt.
Acceleration
Unlike all the other corrections here, the
acceleration enrichment is an additive factor; take the result of all the
above multiplied through, then add this one on. Returned from MegaSquirt®
in "tpsaccel".
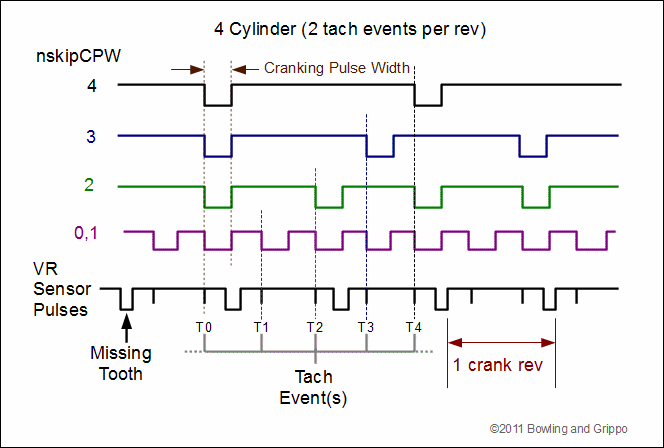
Runtime Messages
This message is a decoded version of the MegaSquirt®
engine status variable "engine." Possible status values are
(these are their names in the controller code megasquirt.h and
megasquirt.asm):
- Connected
- TunerStudioMS is communicating with the MegaSquirt® controller.
- Cranking
- whether the engine is cranking (i.e., RPM is less than 300).
- Running -
whether the engine is considered to be running or not.
- Warmup -
indicates that the engine is in warmup due to coolant temperature. You
can change the TPS acceleration enrichment behavior by changing the
"Warmup Enrichment Bins," below.
- Afterstart - indicates if after-start
warmup enrichment is being done (see Afterstart Enrichment in the next
section).
- ACCEL -
tells us if MegaSquirt® is applying acceleration/deceleration enrichment.
- DECEL -
indicates any acceleration enleanment (de-enrichment).
Return to help
index
- VE
Table 1
This window enables you to tune the VE table 'on
the fly'. On the left are a number of gauges, and on the right are two
items - a graphical representation of the VE table at the top, and a
status box at the bottom.
Cursor
The "cursor" is the red cross on the tuning RPM vs MAP graph on
the right half of the screen. The values corresponding to the current
cursor position are displayed in the status window in the same color as
the cursor. These represent the values that will be changed when the
shift-up/down arrows are pressed.
Spot
The "spot" is the green dot specifying current engine operating
position in the VE graph. The numeric values corresponding to the spot are
displayed in green in the status window.
Keystrokes
- Arrows move the
cursor.
- Shift-Up (or Q) =
richer at that point on the VE map.
- Shift-Down (or W) =
leaner at that point.
- Ctrl-Shift-Up =
increase ReqFuel by 0.1 ms.
- Ctrl-Shift-Down =
reduce ReqFuel by 0.1 ms.
- F = Find and place cursor on map intersection
nearest the spot.
- G = Goto spot; continuous "F" mode.
- Z = Zoom between a 2D and 3D display of the VE
graph. 2D mode makes it much easier to see where the spot is with
respect to the cursor, but 3D mode allows you to easily see when you
have vertices that are out of agreement with the rest of the table.
To navigate the VE map on the right of the Tuning
screen, use the arrow keys move the tuning cursor, up moves up on the MAP
axis of the grid and down moves to a lower MAP bin. If you know VI, then
you can alternatively use the standard motion keys from that editor; use
"k" to go up, "j" to go down, "h" to go left and "l" to go right. Left and
right arrow keys move to the higher and lower RPM bins, respectively.
The shifted up and down arrow keys richen or lean
the VE table bin at the cursor. Alternatively, the "q" key richens the
currently selected bin and "w" leans it. Whenever you change a value in
TunerStudioMS, it is immediately changed in the MegaSquirt® controller's RAM.
These changes will go away when you turn off the engine if you do not save
them into flash memory by typing "b" for "burn to flash."
You can also easily modify the required fuel value
on the tuning screen. Hold both shift and ctrl down while typing up and
down arrow keys, each keystroke will change the value up or down by 0.1
ms.
You can rotate the grid so you can see the values
better on the 3D window more clearly. Hit the "m" and "n" keys and
see what happens. Once you find an orientation you like, copy down the
numbers that are displayed in the status window and you can set those as
your defaults in the base ini file:
gridOrient = 250, 0, 340 ; Space 123 rotation of grid in degrees.
Return to help
index
- VE
Table 2 (dual table mode only)
This window enables you to tune the second VE
table in dual table mode 'on the fly'. On the left are a number of gauges,
and on the right are two items - a graphical representation of the VE
table at the top, and a status box at the bottom.
Cursor
The "cursor" is the red cross on the tuning RPM vs MAP graph on
the right half of the screen. The values corresponding to the current
cursor position are displayed in the status window in the same color as
the cursor. These represent the values that will be changed when the
shift-up/down arrows are pressed.
Spot
The "spot" is the green dot specifying current engine operating
position in the VE graph. The numeric values corresponding to the spot are
displayed in green in the status window.
Keystrokes
- Arrows move the
cursor.
- Shift-Up (or Q) =
richer at that point on the VE map.
- Shift-Down (or W) =
leaner at that point.
- Ctrl-Shift-Up =
increase ReqFuel by 0.1 ms.
- Ctrl-Shift-Down =
reduce ReqFuel by 0.1 ms.
- F = Find and place cursor on map intersection
nearest the spot.
- G = Goto spot; continuous "F" mode.
- Z = Zoom between a 2D and 3D display of the VE
graph. 2D mode makes it much easier to see where the spot is with
respect to the cursor, but 3D mode allows you to easily see when you
have vertices that are out of agreement with the rest of the table.
To navigate the VE map on the right of the Tuning
screen, use the arrow keys move the tuning cursor, up moves up on the MAP
axis of the grid and down moves to a lower MAP bin. If you know VI, then
you can alternatively use the standard motion keys from that editor; use
"k" to go up, "j" to go down, "h" to go left and "l" to go right. Left and
right arrow keys move to the higher and lower RPM bins, respectively.
The shifted up and down arrow keys richen or lean
the VE table bin at the cursor. Alternatively, the "q" key richens the
currently selected bin and "w" leans it. Whenever you change a value in
TunerStudioMS, it is immediately changed in the MegaSquirt® controller's RAM.
These changes will go away when you turn off the engine if you do not save
them into flash memory by typing "b" for "burn to flash."
You can rotate the grid so you can see the values
better on the 3D window more clearly. Hit the "m" and "n" keys and
see what happens. Once you find an orientation you like, copy down the
numbers that are displayed in the status window and you can set those as
your defaults in the base ini file:
gridOrient = 250, 0, 340 ; Space 123 rotation of grid in degrees.
Return to help
index
- AFR
Table 1 (Wide band O2 sensor only)
This window enables you to tune the AFR
table 'on the fly' if you have the wide band sensor option selected. On
the left are a number of gauges, and on the right are two items - a
graphical representation of the AFR table at the top, and a status box at
the bottom.
Cursor
The "cursor" is the red cross on the tuning RPM vs MAP graph on
the right half of the screen. The values corresponding to the current
cursor position are displayed in the status window in the same color as
the cursor. These represent the values that will be changed when the
shift-up/down arrows are pressed.
Spot
The "spot" is the green dot specifying current engine operating
position in the VE graph. The numeric values corresponding to the spot are
displayed in green in the status window.
Keystrokes
- Arrows move the
cursor.
- Shift-Up (or Q) =
leaner (higher AFR) at that point on the VE map.
- Shift-Down (or W) =
richer (lower AFR) at that point.
- F = Find and place cursor on map intersection
nearest the spot.
- G = Goto spot; continuous "F" mode.
- Z = Zoom between a 2D and 3D display of the VE graph. 2D mode makes it much easier to see where the spot is with respect to the cursor, but 3D mode allows you to easily see when you have vertices that are out of agreement with the rest of the table.
To navigate the AFR map on the right of the Tuning screen, use the arrow keys move the tuning cursor, up moves up on the MAP axis of the grid and down moves to a lower MAP bin. If you know VI, then you can alternatively use the standard motion keys from that editor; use "k" to go up, "j" to go down, "h" to go left and "l" to go right. Left and right arrow keys move to the higher and lower RPM bins, respectively.
The shifted down and up arrow keys richen or lean the AFR table bin at the cursor. Alternatively, the "w" key richens the currently selected bin and "q" leans it. Whenever you change a value in TunderStudioMS, it is immediately changed in the MegaSquirt® controller's RAM. These changes will go away when you turn off the engine if you do not save them into flash memory by typing "b" for "burn to flash".
Note that the AFR gauge on the left is showing you the current AFR of the exhaust gases according to the wideband feedback (and assuming it is set up correctly, etc.).
The green lettering is showing you the table value at the current conditions. That is, it is showing you the target AFR. The gauge will only match this if the EGO correction is enabled and has sufficient range to get to the target level. Since you have the authority set to zero, you wouldn't expect them to agree.
The red lettering is showing you the AFR from the table at the currently selected table position (i.e. the AFR of the table target value as you move around the 12x12 table). This is the table's target AFR value that will be adjusted if you choose to do that. It will be the same as the green value if the cursor is moved to the current operating conditions.
So the gauge is showing you what you are getting, the green is showing what you are aiming for, and the red is showing you what you will change if you use the shift-up or shift-down arrow keys.
You can rotate the grid so you can see the values better on the 3D window more clearly. Hit the "m" and "n" keys and see what happens. Once you find an orientation you like, copy down the numbers that are displayed in the status window and you can set those as your defaults in the base ini file:
gridOrient = 250, 0, 340 ; Spatial rotation of 3-D table graphical view grid in degrees.
Return to help
index
- AFR
Table 2 (MS-II/Wide band O2 sensor/dual table mode only)
This window enables you to tune the MS-II™ AFR table 'on the fly' if you have the wide band sensor option and the dual table mode selected. On the left are a number of gauges, and on the right are two items - a graphical representation of the AFR table at the top, and a status box at the bottom.
Cursor
The "cursor" is the red cross on the tuning RPM vs MAP graph on the right half of the screen. The values corresponding to the current cursor position are displayed in the status window in the same color as the cursor. These represent the values that will be changed when the shift-up/down arrows are pressed.
Spot
The "spot" is the green dot specifying current engine operating position in the VE graph. The numeric values corresponding to the spot are displayed in green in the status window.
Keystrokes
- Arrows move the cursor.
- Shift-Up (or Q) = leaner (higher AFR) at that point on the VE map.
- Shift-Down (or W) = richer (lower AFR) at that point.
- F = Find and place cursor on map intersection
nearest the spot.
- G = Goto spot; continuous "F" mode.
- Z = Zoom between a 2D and 3D display of the VE graph. 2D mode makes it much easier to see where the spot is with respect to the cursor, but 3D mode allows you to easily see when you have vertices that are out of agreement with the rest of the table.
To navigate the AFR map on the right of the Tuning screen, use the arrow keys move the tuning cursor, up moves up on the MAP axis of the grid and down moves to a lower MAP bin. If you know VI, then you can alternatively use the standard motion keys from that editor; use "k" to go up, "j" to go down, "h" to go left and "l" to go right. Left and right arrow keys move to the higher and lower RPM bins, respectively.
The shifted down and up arrow keys richen or lean the AFR table bin at the cursor. Alternatively, the "w" key richens the currently selected bin and "q" leans it. Whenever you change a value in TunerStudioMS, it is immediately changed in the MegaSquirt® controller's RAM. These changes will go away when you turn off the engine if you do not save them into flash memory by typing "b" for "burn to flash". TunerStudioMS gives you the option of whether the values are burned to flash immediately or not.
You can rotate the grid so you can see the values better on the 3D window more clearly. Hit the "m" and "n" keys and see what happens. Once you find an orientation you like, copy down the numbers that are displayed in the status window and you can set those as your defaults in the base ini file:
gridOrient = 250, 0, 340 ; Space 123 rotation of grid in degrees.
Return to help
index
- Spark Advance Table (adv_table):
This window enables you to tune the MS-II ignition
advance table 'on the fly'. On the left are a number of gauges, and on the
right are two items - a graphical representation of the advance table at
the top, and a status box at the bottom.
Cursor
The "cursor" is the red cross on the tuning RPM vs MAP graph on
the right half of the screen. The values corresponding to the current
cursor position are displayed in the status window in the same color as
the cursor. These represent the values that will be changed when the
shift-up/down arrows are pressed.
Spot
The "spot" is the green dot specifying current engine operating
position in the VE graph. The numeric values corresponding to the spot are
displayed in green in the status window.
Keystrokes
- Arrows move the
cursor.
- Shift-Up (or Q) =
increased advance at that point on the VE map.
- Shift-Down (or W) =
decreased advance at that point.
- F = Find and place cursor on map intersection
nearest the spot.
- G = Goto spot; continuous "F" mode.
- Z = Zoom between a 2D and 3D display of the VE
graph. 2D mode makes it much easier to see where the spot is with
respect to the cursor, but 3D mode allows you to easily see when you
have vertices that are out of agreement with the rest of the table.
To navigate the spark advance map on the right of
the Tuning screen, use the arrow keys move the tuning cursor, up moves up
on the MAP axis of the grid and down moves to a lower MAP bin. If you know
VI, then you can alternatively use the standard motion keys from that
editor; use "k" to go up, "j" to go down, "h" to go left and "l" to go
right. Left and right arrow keys move to the higher and lower RPM bins,
respectively.
The shifted down and up arrow keys increase or
decrease the advance in the ignition table bin at the cursor.
Alternatively, the "w" key richens the currently selected bin and "q"
leans it. Whenever you change a value in TunerStudioMS, it is immediately
changed in the MegaSquirt® controller's RAM. These changes will go away
when you turn off the engine if you do not save them into flash memory by
typing "b" for "burn to flash".
You can rotate the grid so you can see the values
better on the 3D window more clearly. Hit the "m" and "n" keys and
see what happens. Once you find an orientation you like, copy down the
numbers that are displayed in the status window and you can set those as
your defaults in the base ini file:
gridOrient = 250, 0, 340 ; Space 123 rotation of grid in degrees.
In general, you want:
- Low MAP (low engine load) = more spark advance
- High MAP (high engine load) = less spark
advance
- Low CLT (cold engine) = more spark advance
- High CLT (warm engine) = less spark advance
- Low RPM = less spark advance
- High RPM = more spark advance
To set the spark advance table, you should
try to understand what your engine needs in the following areas:
- total advance at WOT: should be from ~24° to ~40° depending on your bore size and
combustion chamber characteristics. Older design engines (i.e. push
rods, domed pistons, etc.), and those with large bores (big blocks,
etc.) need more advance, about 36 to 38°. Newer designs (4
valve/cylinder, swirl port engines, etc.), and small bores, generally
require less, about 28 to 32°. Engines that have a lot of miles on them
require less as well, because of oil leakage into the chamber. Lower
octane fuel also requires less advance (it burns more quickly), so if
you are running 87 octane, use a few degrees less total advance than if
you are running 94 octane.
- RPM based advance:
Generally for a performance engine, you want the advance to be 'all-in'
by 3000 rpm. So for a given MAP (say 100 kPa) the spark advance should
rise from the initial value to the maximum by about 3000 rpm, then
remain constant.
- vacuum (MAP) advance: as the load on the engine is reduced, the fuel burns more
slowly and more advance is required. This means that you should have the
advance increase for a given rpm as the MAP value decreases in kPa. So,
for example, if you have 32° advance at 4000 rpm and 100 kPa, you might
have 40° advance at 4000 rpm and 50 kPa. You can make the intervening
values evenly spaced to begin with, and tune them later. You can
experiment by using up to 10° to 20° more advance at the lowest kPa bins
compared to the highest kPa bins.
Return to help
index
- Warmup Wizard
In this dialog you can set the warm-up enrichment (WUE) bin values and a few other related settings. The WUE bins are used to provide additional fuel during warmup, much like a 'choke' on a carburetor. A WUE value of 100 means no enrichment. Typically values are 100% at the highest temperature (usually 160°F) and increase up to around 160 or more by -40°F. Setting a warmup enrichment bin to 100 (usually the last one, but you can set it to 100% at other bins too) disables the warm-up enrichment. You can edit the temperature bins themselves, as well (see this).
Some things to be aware of:
- Note that the ASE and prime pulse values are grayed out in the warm-up wizard for some firmware releases. They are listed under 'Fuel-Set-Up/AfterStart Enrichment' or 'Fuel-Set-Up/Other Fuel Settings' if you have chosen 2-point over tables for the 'Prime, ASE, WUE, baro Tables' under 'Fuel Set-Up/General'. If you have chosen 'Tables' see the items under 'Other Tables'. The items are missing from the warmup wizard because there are no INI 'adjustments' for the warm-up wizard, and the hard-coded warm-up wizard only allows 1-point values to be changed. Since the code now only has 2-point or tables, displaying the 1-point values is quite misleading.
Return to help
index
- Acceleration Wizard
Acceleration enrichment (AE) occurs when you open
the throttle "rapidly" to avoid bogging the engine. In v.1.01 MegaSquirt® EFI Controller,
this is done solely based upon the rate of change in the throttle position
sensor (also called TPSDOT).
MegaSquirt-II allows this acceleration enrichment to be triggered by a change in the TPS (TPSdot) or a change in the MAP (MAPdot) or any combination of the two.
The MAPdot settings are on the left side of the accel wizard, and the TPSdot settings are on the right. Each column of 4 bins allows you to specify the rate of MAPdot or TPSdot, and in the corresponding bin (to it's right) you can specify the amount of fuel (in milliseconds per injection) that should be added to the pulse width calculated based ont he MAP, rpm, etc.
Acceleration Enrichment
Bins (ms)
These bins specify the actual
enrichment in terms of pulse width. They are linearly interpolated to
determine a value that is ultimately added to the computed pulse width.
The array of values is called "TPSAQ" as
stored in MegaSquirt. Note that with MegaSquirt-II, you have two sets of
bins, one for TPS based acceleration enrichment, and the other for MAP
based acceleration enrichment.
You can use the slider to choose between the TPSdot and MAPdot accel enrichments. Move it to the left to select more MAPdot accel enrichment, and to the right for more TPSdot enrichment.
Below the accel bins are a number of other settings:
MAPdot Threshold
This is the threshold in kPa/sec below which no
acceleration enrichment will occur (you can move the throttle from idle to
full open without acceleration enrichment, if you open it slowly enough).
A typical value is 80 kPa/sec. Tuning Note: While you are tuning the VE table you should set this
threshold artificially high (maybe 150.0) to disable acceleration
enrichment completely. After the VE table is fairly well-defined, set this
back to 80 and begin tuning AE.
TPSdot Threshold
This is the threshold in %/sec below which no
acceleration enrichment will occur (you can move the throttle from idle to
full open without acceleration enrichment, if you open it slowly enough).
A typical value is 15%/sec.
Note that if you have tuned this value and have it set to your satisfaction, this change won't affect your tune, it will simply be displayed as 10x larger.
Accel Time (sec)
This value indicates how long the acceleration
enrichment "squirt" will last. Typical values are around 0.3 second.
MegaSquirt® stores this value in the variable "TPSACLK".
Accel Taper Time (sec)
This value indicates how long after the 'Accel Time' that MegaSquirt® tapers the acceleration enrichment from the 'bin value' to the 'End Time'.
enrichment "squirt" will last. Typical values are around 0.2 second.
MegaSquirt® stores this value in the variable "TPSACLK".
End Time (sec)
This value indicates how long the acceleration
enrichment will be after the 'Accel Time' + 'Accel Taper Time'. Typical values are around 0.5 millisecond.
MegaSquirt® stores this value in the variable "TPSACLK".
Cold Accel Enrichment
(ms)
The acceleration enrichment pulse also
varies depending upon coolant temperature. The value specified here is the
pulse width added to the value from the bin calculations at -40 F. The
Cold Acceleration Enrichment amount is linearly interpolated from full
amount at -40 F down to zero at 165 F. A typical value might be 2.0 ms.
This value is stored in the "TPSACOLD"
variable in MegaSquirt.
Cold Accel Multiplier
(%)
Another means for increasing the amount of
fuel delivered by the acceleration enrichment pulse is supplied by this
value; it is likewise interpolated from the full specified amount at -40F
down to zero at 165 F. Before the Cold Acceleration Enrichment value is
added to the base acceleration enrichment pulse width, it is multiplied by
this value. Total AE = Base AE * CAM + CAE The difference between the two
types of AE cold modify can be easily seen with a few examples:
1) Assume we have a calculated AE pulse of 5.0 ms.
Say our coolant temperature is 40 F, giving a CAE pulse of 2.0 ms and CAM
is turned off (100%). The result is 5.0+2.0 = 7.0 ms.
2) Assume same base AE and temperature, but now we
turn off CAE (0.0 ms) and set CAM to give 140%. The result is the same, we
get 5.0*1.4 = 7.0 ms.
3) Take the first case, but hit the accelerator
faster, giving 8.0 ms base AE pulse. We now have a result of 8.0+2.0 =
10.0 ms.
4) Take case 2, but with the higher base AE pulse,
giving 8.0*1.4 = 11.2 ms. The bottom line is that the CAE modifier is
constant and independent of the base pulse, where on the other hand, the
CAM modifier has a proportional effect on the AE, bigger base pulse means
bigger result. This value is stored in the "ACMULT" variable in MegaSquirt.
Decel Fuel Amount
(%)
When you let off the throttle rapidly
(that is the closing rate exceeds TPSDOT Thresh) and the engine is turning
faster than 1500 RPM, then deceleration fuel cutoff is performed by MS.
Deceleration fuel amount is multiplied by the "normal" pulse width, that
is, if the calculated pulse is 12.0 ms and you have 20% decel amount, then
the resulting pulse width is 2.4 ms. A value of 100% causes the fuel to
remain at its calculated value, and can cure bucking on deceleration in
vehicles with manual transmissions; those with automatic transmissions may
benefit in fuel economy by using values below 100%. The MegaSquirt®
variable "TPSDQ" holds this value as a
percentage.