The document contains a DRAFT information. It should not be used without verifying all details. If you have a MegaSquirt-II running the VAST set-up, please give us some feedback at: www.msefi.com
Toyota's variable advance spark timing system (VAST) was used on a *bunch* of Toyota vehicles that use VAST. The MR2, Celica, Toyota pickup, and Toyota 4runner all use VAST (~1985-1993), including some 2SE, 22RE, 22RTE, 4VE and 4AGE engines.
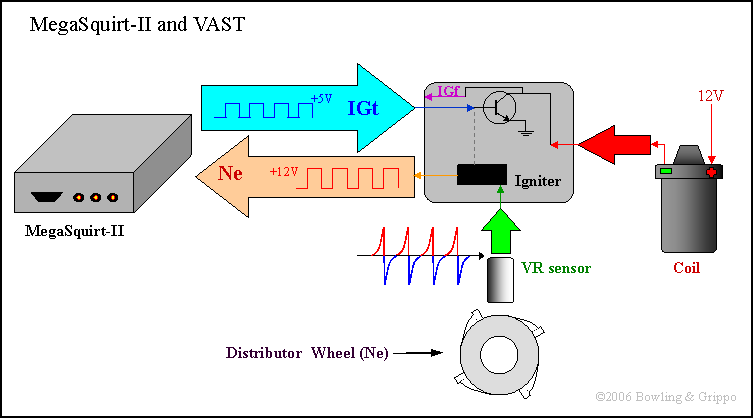
VAST uses four main signals to control ignition timing:
VAST can be controlled with MegaSquirt-II by configuring the hardware and software appropriately.
Input
The Ne signal (crankshaft position and rpm) is the one you use for the tach trigger, and G is a cam sync signal (that we don't use - until the router board is available!). Ne is an alternating current signal, but it is converted to a square wave by the igniter on its way to the ECU.
To take the square wave Ne signal, you can use the Hall input circuit. The use the Hall input circuit, you need to:
The Hall input requires a 12 Volt pull up, so:
The Ne signal wheel can have 4 or 24 teeth. 4 teeth should work fine for 4 cylinder engines. For 6 cylinder engines, a 24 tooth wheel would be necessary. With a 24 tooth wheel, two teeth need to be removed to simulate a 12-1 missing tooth crankshaft wheel, and V2.6+ MS-II code used. For the missing tooth code, you need to set:
| Parameter | 4 cyl. | 6 cyl. |
| Trigger wheel teeth | 12 | 12 |
| Missing teeth | 1 | 1 |
| Skip teeth | 6 | 4 |
| Delay teeth | depends on set-up - see text | |
The delay teeth depends on the teeth you remove. they must be directly across from each other, and ideally you will arrange to have the pick-up sensor directly across from the first tooth after a missing tooth, in which case the delay tooth setting will be 0. See this page for more information.
Alternatively, with the 24 tooth wheel you can grind off:
IGf - the spark confirmation signal - can be left open and not connected. Do not allow it to short to anything, of course!
Without signals connected, the engine *should* start and run at its base timing (for the non-missing tooth configuration, at least). So that's the first step in installing the system, try and get it to start and idle with no timing connections, then see what happens to the timing as you add signals.
Output
The igniter starts the dwell when the signal from the ECU goes high, and fires the coil when the signal goes low. This mirrors the current flow through the coil, just like an HEI module. So the 'spark output' in MegaTune should be set to 'going high (inverted)' (this seems backwards, but the terminology derives from the beta days when there was an extra transistor in the circuit).
However, the output from the processor is not very high (~10 milliAmps), and we don't know what sort of current is required by the igniter, so use a 5 Volt pull-up circuit on the VB921 (or BIP373) and use that to provide the IGt (IGnition Timing) signal to ensure it has enough current to drive the power transistor.
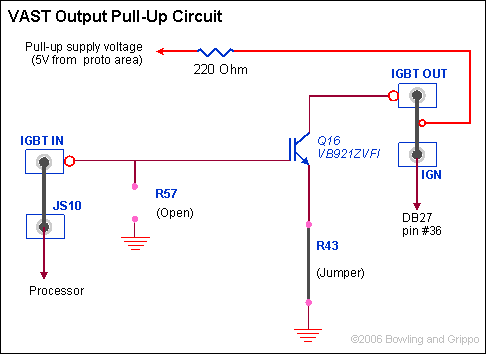
(Note that you can substitute a TIP120 in place of the VB921/BIP373 for switching the signal, it is much cheaper - ~75¢ compared to $6.00 - and more commonly available. Don't use a TIP120 for direct coil control, of course, it doesn't have the voltage or current protections.)
Note that 'Spark Output' needs to be tested to make sure it is correct. Test the coil to see if it is charging when the key is on but the engine isn't running. It should not be. The safest way to do this is to replace the coil with a LED tester (see #6 here: www.megamanual.com/ms2/V3trouble.htm) while checking for current at the coil (be sure to get the tester the right way around). Whichever setting does not have the coil charging in this circumstance is correct. This thread goes into more detail.
Wiring the Igniter
You connect DB37 pin #36 to IGt from the igniter. Then you connect the Ne line from the igniter to DB37 pin #24. Check your service manual to see which wires these are on your vehicle.
Note: When you connect pin 36 to IGt pin on the igniter, you might the tach on the dash jumps erratically, the car misfires, sometimes timing will stay at 10º BTDC, and sometimes it will advance to 30º BTDC, no matter what you set in the timing menu in MegaTune. in these circumstances, the engine will misfire and skip cylinders. In this case, as soon as you disconnect the IGt wire, the engine *should* run fine and the tach on the dash should be normal (but without MegaSquirt® controlling the timing, of course!).
The problem is most likely that the board was pulling the signal down too low for the igniter to properly read it. A simple fix, add an in-line resistor to the wire going from MegaSquirt® pin #36 to IGt to prevent it from pulling the IGt signal down too far. Start with 1K Ohms (¼ Watt, or even less, is fine). If the resistance is too low, the problem will remain, if the resistance is too high MegaSquirt® won't be able to trigger the igniter. You may have to experiment with differing resistances to find a value that works for your installation.
Ignition Settings for MegaTune
Parameter | Value |
| Ignition Input Capture | Rising Edge ('Falling Edge' for MicroSquirt® if using the VR input circuit) |
| Cranking trigger | Trigger Rise |
| Coil Charging Scheme | Standard Coil Charge |
| Spark Output | Going Low (Normal) ('Going Low (Normal)' for MicroSquirt) |
For dwell settings, set the maximum dwell duration to 3.0, then adjust it with the car running and idling. Lower the dwell period in 0.1 millisecond steps, being sure to blip the throttle between each change. If the idles smoothly, and accelerates cleanly, reduce the dwell another 0.1 and test again. Repeat until the dwell causes a stumble, then increase it by 0.2 milliseconds. Test drive the vehicle to make sure the engine does not stumble do to ignition issues under any conditions.
Note that in some cases you may have stumbles even at 3.0 milliseconds. In those cases, increase the dwell by 0.1 at a time until the stumbles are gone, then increase it another 0.2 milliseconds.
Controlling your TVIS with the MS-II
Toyota Variable Intake System (TVIS) is an extra set of butterflies that close off one of the intake ports below 4500 rpm to increase air flow and fuel atomization. They are operated by manifold vacuum, which in turn is controlled by an electrical signal from the ECU.
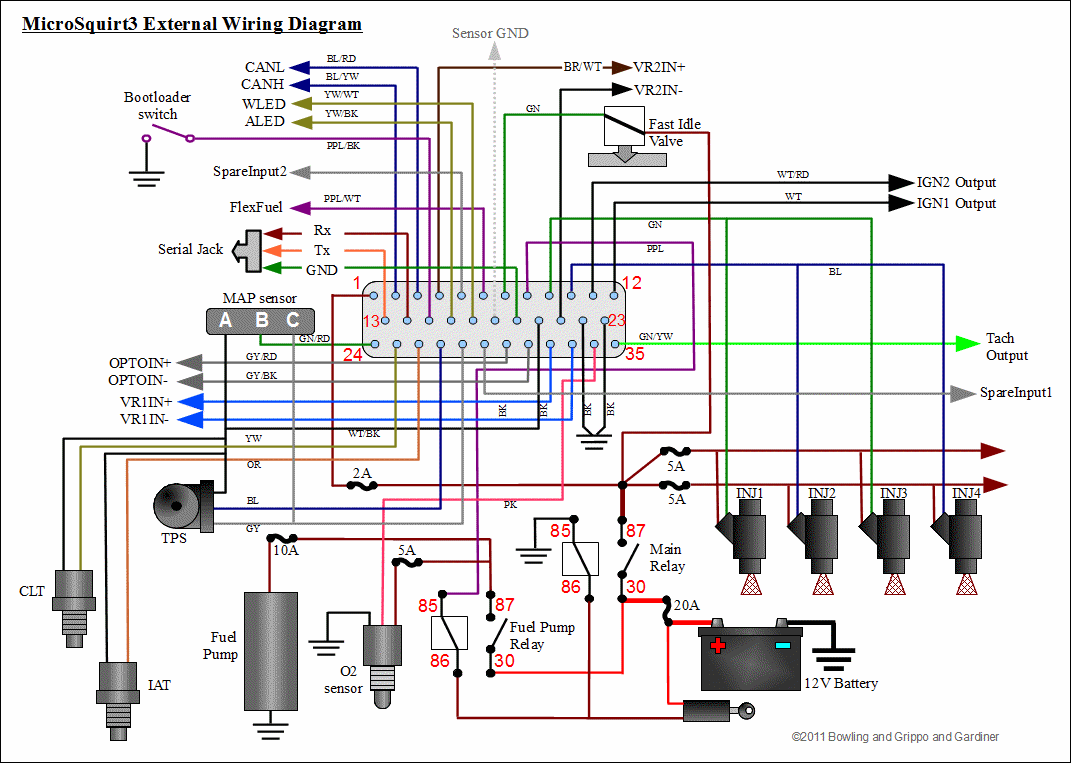
For MS-II units with firmware version 2.3 or later you don't need to modify any circuits to use TVIS. You use the FIDLE output on pin 30. See the spare outputs page for more information on the MS-II outputs. You can set the FIdle port (PM2) to ground pin 30 to activate the relay based on an rpm and MAP (or coolant temperature, etc.). You could use this with the relay board and use the FIDLE relay itself as your TVIS relay.
Toyota Temperature Sensor Information
MegaSquirt-II allows you to recalibrate the temperature sensors under 'Tools/Calibrate Thermistor Tables'. The info you will need is:
Coolant Temperature
| Bias resistor value: | 2490 |
| Temperature | Resistance |
| 32°F | 5750 |
| 66°F | 2830 |
| 212°F | 200 |
Intake Air Temperature
| Bias resistor value: | 2490 |
| Temperature | Resistance |
| 4°F | 15000 |
| 68°F | 2500 |
| 140°F | 550 |
Other VAST Information
Here are some of the links that were used to gather the info in this document: