The Windows 9x/ME/XP/Vista software application you use to tune and configure your MegaSquirt® or MegaSquirt-II is either Tuner Studio by Phil Tobin or MegaTune by Eric Fahlgren. (Version 2.25 or higher is needed to work with MegaSquirt-II™). You also need Windows 9x/Me/XP on a computer (a laptop or notebook computer if you want to tune in the car) and a conventional serial port to communicate with MegaSquirt-II™. A USB/serial converter may work, and many people have reported that they have been successful using a USB-serial adapter. Just about any computer that is capable of booting Windows 95 (or better) will be fast enough, but get the fastest laptop computer you think is reasonably priced, obviously. This document covers the use of the 2.8 versions of embedded software (aka. "code") on MegaSquirt-II™.
Note that for 2.88 Code, the first thing you must do after loading code is set the ECU Type (under 'Fuel Set-Up/General') to match your hardware (MS-II™ or MicroSquirt® controller), MegaTune will not let you change anything else until you do this. Do not change settings, expect the stimulator to work, load an MSQ, etc., until you have set the ECU Type (MS-II = 1, MicroSquirt® = 2, the MS-II Sequencer will be 3). This setting applies to MS-II derivatives with code 2.88 or higher code only.
ECU Type setting was inserted to head off the potential MicroSquirt® problems due to the coils being turned on with the old default configuration. As of the 2.88 code, if ECU Type is not set, the code will put the ignition outputs in a safe state (cycling the tach display from 0 to 8000 rpm, and also flashing the fuel pump LED) and wait until a known ECU type is put in by the user.
| Introduction to MegaTune | Installation | File | Fuel Set-Up |
| Ignition Set-Up | Basic Tables 'Basic Tables' are displayed as 12x12 'spreadsheets' to allow easy viewing of the numbers in the tables. This is best for setting up the tables. For tuning the tables in the vehicle or on a dyno, see the 'Tuning' menu item. These can be indexed to MAP or MAP/Baro.
|
Basic Tables
These can be indexed to MAP or MAP/Baro.
|
Basic Tables
This can be indexed to MAP or MAP/Baro.
|
| Other Tables | Tuning
Tuning offers a 3-D view of the table a a number of gauges simultaneously, so is a good place to be when actually tuning. |
X-Tau Tuning | Other Tuning |
| Communications | Tools | Help | |
MegaTune2.25+ is MegaSquirt® configuration editor software for Windows 95 (and later). It is written by Eric Fahlgren, and it used for the MegaSquirt® and MegaSquirt-II EFI controller. It allows all of the tuning and set-up parameters to be modified and has a real-time VE table editor, which allow a vehicle passenger to tune the engine while driving.
General Advice and Operation Some general principles to follow when setting the configuration parameters are:
Note that it is possible to damage your engine by choosing inappropriate tuning or set-up parameters in MegaTune. Be sure to read this document, and all associated tuning documents that apply to your engine, vehicle, and tuning circumstances. In particular, read the safety precautions.
How to Tune Using MegaTune/TunerStudio
Information on tuning using tuning software with MegaSquirt® or MegaSquirt-II is listed separately from this section, and depends on the processor you have.
Note: for installing TunerStudio, please see the TunerStudio web site: www.efianalytics.com/TunerStudio/
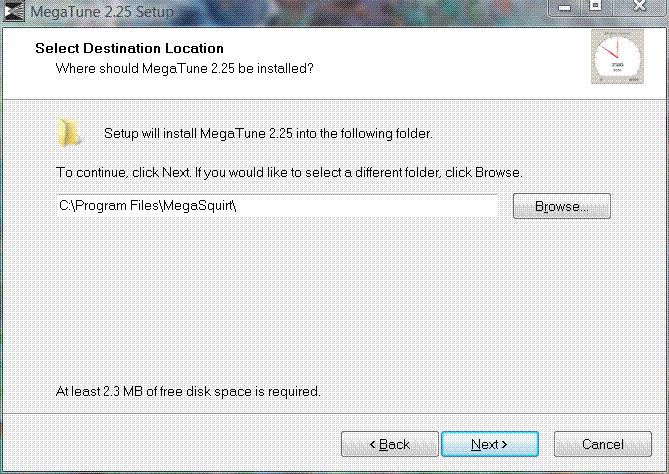
MegaTune has an 'automated' install package, similar to most other modern Windows software. You download the set-up file (see below), click on it, and the package virtually installs itself.
Files Get the latest version of MegaTune from http://www.megamanual.com/files/software/.
Install Process To get the latest version of MegaTune:
While you are in the setting.ini files, you can verify or change the EGO sensor option under LAMBDA_SENSOR if necessary.
You can use mtCfg to change the color depth, temperature units (°F/C) and a large number of other parameters for MegaTune. See the documentation in the files displayed in mtCfg.
Be sure to 'Save' the file. You should now be able to launch MegaTune. Double-click the MegaTune icon (created above) on the desktop.
Communications/Settings dialog on the MegaTune menu.
You should always uninstall MegaTune before installing newer versions.
There are two parts for any firmware release:
If you download a different .s19 file (i.e., a different embedded code version) to your MegaSquirt® EFI Controller, then you must install the corresponding INI file in the place expected by MegaTune.
If the INI file does not correspond to the code you have load, MegaTune will generate an error message when starting. The error you see is telling you that the signature in the INI doesn't match what MegaTune is receiving from MegaSquirt. This can be for a number of reasons, the most common are:
Also, be SURE to set the CODE_VARIANT (MS-II) as well as activating the appropriate INI file, both actions are necessary.
Creating and Selecting New Projects
MegaTune allows you to manage data for multiple MegaSquirt® installations on the same computer. First you must use the installer to build yourself a default setup. Once you have a basic MegaTune setup, use mtCfg.exe to create a new project. Open mtCfg, then click on 'Project/New', type in the project's name, then click on okay.
Instead of "carN", use a real name, for example "Corvette" and "Audi" (the actual names are of no significance to MegaTune, they are there entirely for your convenience, so give them descriptive names that work for you.
Then use mtCfg to configure the new projects code variant, ego sensor, etc.
When you have only a single car directory, MegaTune assumes that you want to use that one, so starts there automatically. When you have more than one, MegaTune will present you with a list of choices at startup, so you can work on the correct one. By typing the initial letters of the project name, you can jump down the select list to the desired one quite quickly. Once you have the desired project highlighted, just hit the enter key or use the mouse to click "Ok."
In the processor specific configuration file (megasquirt-II.ini) in the MegaTune folder, you can edit the gauges to show ranges and warning appropriate to your combination. (Note that you must 'activate' the appropriate file before editing it!) To do this, open the file using Notepad or another text editor.
Each gauge has a number of properties, these are:
Examples:
Name Var Title Units Lo Hi LoD LoW HiW HiD vd ld
advBucketGauge = veTuneValue, "Advance Bucket", "degrees", 0, 55, -1, -1, 999, 999, 1, 1
advdegGauge = advance, "Ignition Advance", "degrees", 0, 50, -1, -1, 999, 999, 1, 1
Note that many of the variables are represented on the runtime, tuning, and front pages, and you may need to set additional parameters to get them all to look the way you want. For example, the EGO display on the front page is set in this section:
[FrontPage]
#if NARROW_BAND_EGO
   egoLEDs         =  0.0, 1.0,  0.5 ; Voltage settings.
#elif LAMBDA
   egoLEDs         =  1.5, 0.5,  1.0 ; Lambda settings.
#else
   egoLEDs         = 19.7, 9.7, 14.7 ; Afr settings.
#endif
To change the gauges on the front page, find a section of your code's INI file similar to:
[FrontPage]
#if   NARROW_BAND_EGO
   egoLEDs         =  0.0, 1.0,  0.5 ; Voltage settings.
#elif LAMBDA
   egoLEDs         =  1.5, 0.5,  1.0 ; Lambda settings.
#else
   egoLEDs         = 19.7, 9.7, 14.7 ; Afr settings.
#endif

   ; Gauges are numbered left to right, top to bottom.
   ;
   ;    1  2  3  4
   ;    5  6  7  8

   gauge1 = tachometer
   gauge2 = throttleGauge
   gauge3 = pulseWidth1Gauge
#if   NARROW_BAND_EGO
   gauge4 = egoGauge
#elif LAMBDA
   gauge4 = lambda1Gauge
#else
   gauge4 = afr1Gauge
#endif
   gauge5 = mapGauge
#if IAC_GAUGE
   gauge6 = IACgauge
#elif PWM_GAUGE
   gauge6 = PWMIdlegauge
#else ; FIDLE_GAUGE
   gauge6 = matGauge
#endif
   gauge6 = xTauGauge
   gauge7 = advdegGauge
   gauge8 = dwellGauge
Change the gauge assignments to those you prefer. Note that the value after the 'gaugeX =' label MUST appear in the [GaugeConfigurations] section of the INI file.
So while the type of sensor is set in the vehicle specific folder, the limits are set here. In most cases the defaults work well, but you can change them to suit your purposes. The format is name, upper limit, lower limit, switch point.
Expressions
MegaTune allows you to compute values from MegaSquirt-II's output channel data or from constants and settings in the database. These can then be used in datalogs or gauges.
Data types:
Operators in order of descending precedence:
Built-in math functions and constants:
MegaSquirt-specific functions:
#unset AUTOMARK_LOGGING_FEATURES
#if    AUTOMARK_LOGGING_FEATURES
   [OutputChannels]
      ; Make up some variable names...
      highLoad = { rpm >= 3500 && throttle >= 50 }
      enable   = { rpm >= 2000 }

   [Datalog]
      enableWrite = enable    ; Log entries are only written when the variable
                              ; "enable" is true, see it's definition above.

      markOnTrue  = highLoad  ; A datalog marker is written when "highLoad"
                              ; transitions from false to true.  The marker
                              ; looks like "MARK 001 highLoad" to distinguish
                              ; it from the manual markers.

#endif
|
Change the #unset AUTOMARK_LOGGING_FEATURES to # set AUTOMARK_LOGGING_FEATURES (note we have changed unset to set), and edit the enable conditions (tps/rpm/map/etc.) to your liking.
Datalogging will start when the conditions are met. You still have to start the datalog - Alt+L, <enter>, but MegaTune will only record lines when the conditions are met. So you can start the datalog 20 minutes in advance, knowing the lines are not being added until you want.
As noted in the code snippet above, you can also have MegaTune 'mark' the datalog on specific events by defining other variables (for example 'highload' in the snippet above).
You should always uninstall MegaTune before installing a newer version.
You can uninstall MegaTune in three ways:
MegaTune 2.25 has a menu structure that depends on the hardware and software you have loaded. This document covers only the MegaSquirt-II hardware and v2.8 code configurations. For other configurations, please see the developer's site. At the top of this page is a list of all the menu items in MegaTune 2.25 for MS-II/v2.8. Click on any of them to navigate to specific information on that topic.
Note that for 2.88 Code, the first thing you must do is set the ECU Type (under 'Fuel Set-Up/General') to match your hardware (MS-II or MicroSquirt), MegaTune will not let you change anything else until you do this. ECU Type setting was inserted to head off the potential MicroSquirt® problems due to the coils being turned on with the old default configuration. As of the 2.88 code, if ECU Type is not set, the code will put the ignition outputs in a safe state (cycling the rpm from 0 to 8000 rpm, and also flashing the fuel pump LED) and wait until a known ECU type is put in by the user.
When MegaSquirt® is loaded and communicating with MegaSquirt® EFI Controller, the first thing you will see is the front page, which shows eight of the more useful gauges. A number of the sensor readings are displayed, as well as some outputs. For example, the injector pulse width is the measure in milliseconds of how long the injector is opened for each pulse, regardless of how many times it is opened in a cycle. Duty cycle gives the percentage of time the injector is open irrespective of individual pulse duration.
There is a bar gauge across the bottom of the window shows the oxygen sensor reading. The scale is determined by egoGauge value in the Tuning section of the MegaTune2.25+.ini file. This same setting controls the analog and bar gauges on the tuning page. The first value of this setting controls the lowest voltage displayed on the gauges, the second number controls the highest and the optional third value specifies the €œalert€ value, above which the LEDs are red. The bottom of the front page contains a status bar. The current file name (used for Save operations) is displayed in the left part of the status bar, followed by €œsaved€ status. When the memory image (i.e., the settings you have chosen) has been modified since the last Open or Save operation, this entry shows SAVED in bold face.
The front page also indicates how many times MegaSquirt® has reset since MegaTune was started. These resets can be due to the user manually turning off the power to MegaSquirt® (cycling the ignition switch) OR they could be due to problem with MegaSquirt® or it's power supply.
When MegaSquirt® resets, MegaTune displays RESET X in the lower right corner (where X is the cumulative number of resets, including restarts) - MegaTune will also beep. Resets can cause a number of problems that cause the engine to run badly, including messing up the baro correction and enabling after start enrichment. So you should try to cure any reset issues before putting a lot of effort into tuning.
Resets generally indicate that the power to the processor was interrupted. This could mean that the input power actually was cut, but it can also mean that there was a power surge into the back plane (ground), so that there was no longer a 5v differential between the inputs and the grounds...
Resets are often caused by noisy power supplies (usually the alternator), or poor grounds. So you might recheck that the grounds are good, and add a car stereo power filter to MegaSquirt-II's 12V supply. These are cheap (~$5) and widely available. They typically have three wires: one from a switched 12 Volt source (the original source for MegaSquirt), one to go to MegaSquirt® (with clean power), and a ground wire.
Ignition noise, solenoids turning on or off, and that sort of thing can also cause resets. Check your harness routing to see if any ground or signal wires are near noise sources such as spark plug wires or the coil.
Solve reset issues as they come up, as they will confound your tuning efforts if you proceed without fixing them.
As well as the RESET indicator, MegaSquirt® has a number of other indicators that can be set manually. This is set by editing the variables and values in the indicators sub-section of the [FrontPage] section of the INI file you have activated:
   ;----------------------------------------------------------------------------
   ; Indicators
   ;               expr         off-label          on-label, off-bg, off-fg, on-bg, on-fg
   ;   indicator = { tpsaen }, "Not Accelerating", "AE",     cyan,   white,  red,   black
   ;
   ; Look in the new colorScheme.ini for the basic ones, add more or tell me what to add.

   indicator = { ready              }, "Not Ready",    "Ready",       white, black, green, black
   indicator = { crank              }, "Not Cranking", "Cranking",    white, black, black, white
   indicator = { startw             }, "ASE off",      "ASE ON",         white, black, cyan,   black
   indicator = { warmup             }, "WUE off",      "WUE ON",         white, black, blue, white
   indicator = { tpsaen             }, "Accel Enrich",   "Accel Enrich",   white, black, green, black
   indicator = { tpsden             }, "Decel Cut",      "Decel Cut", white, black, green, black
   indicator = { tps > floodClear && crank }, "Flood clear off", "FLOOD CLEAR ON", white, black, red,   black
   indicator = { batteryVoltage < 10.5 }, "Battery OK",  "Battery LOW", green, black, red,   black
   indicator = { port0              },  "Port 0 Off",  "Port 0 On",   white, black, red,   black
The front page is limited to eight gauges, which may not be enough, especially when you are learning to use MegaTune. If you go to the 'Tuning/Realtime Display', you can see many more variables at once. This is a good page to monitor while experimenting with the stimulator and MegaSquirt. MegaTune2.25+ allows you to save and restore configurations as disk files (they have an .msq extension). Use the Open, Save and Save As menu items to do this.
MegaSquirt has two types of memory RAM, which requires that the power be on for values to be retained, and flash, which retains it's values even when the power is shut off. In MegaTune, values that are edited are change in RAM (and thus affect engine operation) as soon as you move to another field (with the tab key or the cursor). To retain the values when shutting off MegaSquirt-II's power, you must 'burn' the to flash. You do this using the 'burn to ECU' button on the dialogs.
In general, MegaTune only burns the values on the current dialog when you click on the Burn to ECU button. To burn all the values you might have edited, the best method is to save them as a MSQ (which saves the values in RAM) then load and burn it (to flash).
MegaTune can store and retrieve set-up files, both entire set-ups (.msq files), and VE table files (.vex).
For the 2.8 code version, the datalogged variables are:
| Datalog Label | INI Variable | Code Variable (outpc.) | Description | |||||||||||||||||||||
| Time | time | none | This is a time variable generated by MegaTune that counts up with the tuning PC's clock. It is helpful for spotting gaps in the datalog (which can be caused by changing dialog pages (datalogs are not recorded if the user is on some pages) or communications issues.) | |||||||||||||||||||||
| SecL | seconds | seconds | This is the internal CPU clock from the controller's processor. | |||||||||||||||||||||
| RPM | rpm | This is the engine rpm (revolutions per minute). | ||||||||||||||||||||||
| MAP | map | map | The engine intake manifold kPa from the Manifold Absolute Pressure (MAP) sensor. | |||||||||||||||||||||
| MAP/baro | kpaix | kpaix | The current MAP value (above) divided by the current baro value to be used as an alternative load index. Baro pressure is not in the default datalog (the baro correction amount, Gbaro is, but not the baro value the correction is based on). Baro can be added by including the line:
in the [Datalog] section of the INI. | |||||||||||||||||||||
| MAF | maf | maf | This is the Mass Air Flow value determined from the MAF sensor feedback and the MAF table. | |||||||||||||||||||||
| TP | throttle | tps | Throttle opening position in %, o% is closed, 100% is WOT, if the TPS has been calibrated properly. | |||||||||||||||||||||
| vBatt | batteryVoltage | batt | This is the battery voltage as measured at MegaSquirt-II. | |||||||||||||||||||||
| if NARROW_BAND_EGO O2 elif LAMBDA else | egoVoltage lambda1 afr1 | ego1, ego2 | This is the ego sensor output voltage (if a narrow band sensor is selected). | |||||||||||||||||||||
| IAT | mat | mat | The intake air temperature in °F or C, depending on your settings. | |||||||||||||||||||||
| CLT | coolant | clt | The coolant temperature in °F or C, depending on your settings. | |||||||||||||||||||||
| Engine | engine | engine | Engine Operating/Status variables - bit fields for "engine" variable. This value will tell you if the engine was accelerating, warming-up, etc., and can be used to troubleshoot by telling you if accel enrichment, warm-up, etc. was active at any given time.
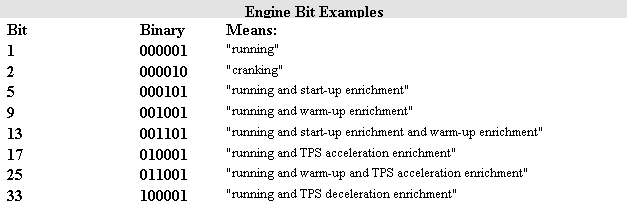 Note that running and cranking are allowed at the same time, so you will normally see 3, not 2, while cranking. | |||||||||||||||||||||
| Gego | egoCorrection | egocor1 | This is the percentage correction to the fuelling pulse width used to adjust the pulse width calculated from the fuelling equation based on EGO sensor feedback. | |||||||||||||||||||||
| Gair | airCorrection | aircor | This is the percentage correction to the fuelling pulse width used to adjust the pulse width calculated from the fuelling equation based on intake air temperature (IAT) density correction and the ideal gas law. | |||||||||||||||||||||
| Gwarm | warmupEnrich | warmcor | This is the warm-up percentage correction to the fuelling pulse width used to adjust the pulse width calculated from the fuelling equation based on coolant temperature (CLT) and the warm-up enrichment table (WUE). | |||||||||||||||||||||
| Gbaro | baroCorrection | barocor | This is the barometric pressure percentage correction to the fuelling pulse width used to adjust the pulse width based on the user's setting for baro correction (2-point, table; start-up, real-time, etc.). | |||||||||||||||||||||
| Gammae | gammaEnrich | gammae | This is the 'net' percentage correction to the fuel pulse width from the other gammas - air density, warmup and barometric corrections (but not including accel enrichments). | |||||||||||||||||||||
| AccelEnrich | accDecEnrich | tpsaccel | This is the 'net' correction (in milliseconds) to the fuel pulse width of accel enrichments, including TPSdot, MAPdot, and X-Tau, where used. | |||||||||||||||||||||
| Gve | veCurr1 | vecurr1 | This is the current interpolated VE value used for the fuelling equation for injector driver #1 (and #2 if not using dual tables), based on the current rpm and MAP value (or alpha-N conversion table, where appropriate). | |||||||||||||||||||||
| PW | pulseWidth1 | pw1 | This is the injector pulse width time in milliseconds (including the opening time) for injector driver #1 (and injector driver #2 unless you are using the dual table option). | |||||||||||||||||||||
| DutyCycle1 | dutyCycle1 | computed by MegaTune | This is the duty cycle of injector driver #1 (and injector driver #2 if dual tables option is not selected). The duty cycle is the percentage of the time available that the injector is opening or squirting. Values over 100% are not physically possible, and indicate that the settings in MegaTune exceed the capabilities of the injectors (which may be too small). | |||||||||||||||||||||
| Gve2 | veCurr2 | vecurr2 | This is the current interpolated VE value used for the fuelling equation for injector driver #2 if using dual tables, based on the current rpm and MAP value (or alpha-N conversion table, where appropriate). | |||||||||||||||||||||
| PW2 | pulseWidth2 | pw2 | This is the injector pulse width time in milliseconds (including the opening time) for injector driver #2 if you are using the dual table option. Otherwise it has no meaning. | |||||||||||||||||||||
| DutyCycle2 | dutyCycle2 | computed by MegaTune | This is the current interpolated VE value used for the fuelling equation for injector driver #2 if using dual tables, based on the current rpm and MAP value (or alpha-N conversion table, where appropriate). | |||||||||||||||||||||
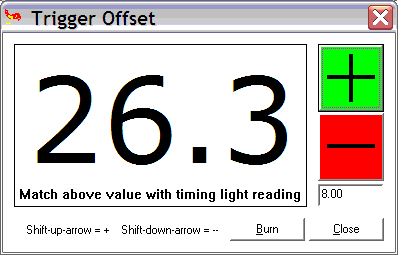
| SparkAdv | advance | adv_deg | The spark advance as seen at the crank shaft, including the all the factors such as trigger offset, spark table value, temperature corrections, etc. It is what you should see on a timing light, if you have set everything up correctly. | |||||||||||||||||||||
| knockRet | knockRetard | knk_rtd | This is the current amount of ignition retard being subtracted from the spark advance table 'look-up' value when knock is detected. It is determined from the user inputs. | |||||||||||||||||||||
| ColdAdv | coldAdvDeg | cold_adv_deg | This is the current amount of ignition advance being added to the spark advance table 'look-up' value advance when the coolant temperature is low. It is determined from the user inputs. | |||||||||||||||||||||
| Dwell | dwell | coil_dur | This is the actual computed dwell output, including all corrections. Does not apply to Ford EDIS. | |||||||||||||||||||||
| tpsDOT | tpsDOT | tpsdot | This is the current rate of change of the throttle position sensor - TPS - output (%/sec). | |||||||||||||||||||||
| mapDOT | mapDOT | mapdot | This is the current rate of change of the manifold absolute pressure (MAP) sensor output (kPa/sec) | |||||||||||||||||||||
| IAC | iacstep | iacstep | This is the current position (number of steps) of the stepper motor from the fully retracted position. | |||||||||||||||||||||
| deltaT | deltaT | dt3 | The time delta (interval, aka. ΔT) between rpm pulses in microseconds. It is the time between skip teeth - the processor is interrupted every time a tooth arrives, when it counts 12 teeth, as in your case, it calculates deltaT as the difference between present CPU clock time and the saved clock time 12 teeth ago. It is accurate to within better than a microsecond, because all the times are stored at the time the tooth arrives, even if the interrupt isn't entered until a bit later because there was another interrupt at that instant. | |||||||||||||||||||||
| Trigger± | trig_fix | trig_fix | The code for toothed wheels checks for missing or extra teeth and handles them if they occur, but only allows one or 2 corrections in a row. More than two corrections and it re-synchs.
The code works like this: when a tooth input arrives, the code checks the new time between teeth against the previous time between teeth. The processor compares the time between teeth = present time - last tooth time, with the previous time between teeth. If the new tooth time is within PulseTol % of the old, it is accepted. If it is out of tolerance too long, the trigger± counter counts down (missing tooth), if too short it counts up (extra tooth). Account is taken of whether it is time for the missing tooth, so the counter is not changed in this case. Also, if 1 tooth is missed, it adds in a virtual tooth, and if there is an extra tooth it ignores it. But it only does this one time in a row, then the next time between teeth must be in tolerance or the ignition input resynchs. However this cycle can repeat indefinitely as long as there is a good tooth after the bad tooth. This will tell users when they have noise or weak signal issues. | |||||||||||||||||||||
| tachCount | tachCount | tachCount | Counts tach pulses for use in correlating datalog values with tach pulses (at low rpm). | |||||||||||||||||||||
| XTau1 | xTauFuelCorr1 | XTfcor0 | This is the current X-tau fuel correction for injector driver #1 (and injector driver #2 if not using the dual table option). | |||||||||||||||||||||
| XTau2 | xTauFuelCorr2 | XTfcor1 | This is the current X-tau fuel correction for injector driver #2 if using the dual table option. | |||||||||||||||||||||
| E85fuelCorr | fuelCorrection | fuelcor | This is the current fuelling correction based on the fuel composition sensor feedback and the flex fuel settings. | |||||||||||||||||||||
| Ethanol% | fuelComposition | computed in MegaTune from default values | This is the current calculating ethanol percentage in the fuel based on the flex fuel sensor feedback. | |||||||||||||||||||||
| AFRtrgt1 | afrtgt1 | afrtgt1 | This is the current target value from the AFR table for the current operating conditions (rpm and MAP kPa). |
Note that there are a number of other items that could be included in a datalog, these are shown in the [OutputChannels] section of the INI.
This allows you to export a VE table. You can export or import VEX files into any of the VE tables. These are saved in the VEX format. Be sure to give your saved files descriptive names. With MegaSquirt-II, you load the files from the tables menu.
This allows you to import a VE table. You can export or import VEX files into any of the VE tables. These are saved in the VEX format. The table will import VEX files of different sizes and automatically adjust them to match the current table size. With MegaSquirt-II, you load the files from the tables menu.
Start up the MT Configurator (from the Start menu under MegaSquirt® EFI Controller, or from MegaTune under 'File/Configurator'). Open the MegaTune2.25 tree item, and you'll see a number of megasquirt-II.ini.N.N files. Pick the one where N.N matches the version of embedded code you are running (i.e., megasquirt-II.ini.2.8), highlight the .ini file version that you wish to use and execute File -> Activate. This will rename it to be "megasquirt-II.ini" (deleting the existing megasquirt-II.ini file first). It will then be used by MegaTune when it starts up.
(Note that all 2.XY use the same 2.X INI file. For example, the v2.853 code uses the 2.8 INI file. This is the way the code upgrades are designed. Major revisions are incremented by +0.1 and require a new INI file, minor revisions (+0.01) use the same INI file.)
You need to tell MegaTune which version of MegaSquirt® you have (MS-II), as well as the EGO type, etc. To do this, use the mtCfg program, which opens automatically during the installation process (it can be opened directly from the MegaTune folder at any later time). Look for the CODE_VARIANT variable, it will be in 'Car1/settings.ini/Settings/CODE_VARIANT' in the directory tree on the left side of the mtCfg window. Click on CODE_VARIANT. You can then use the drop box in the upper right section of the window to select your code variant.
While you are in the setting.ini files, you can verify or change the EGO sensor option under LAMBDA_SENSOR if necessary. You can use mtCfg to change the color depth, temperature units (°F/C) and a large number of other parameters for MegaTune. See the documentation in the files displayed in mtCfg.
Be sure to 'Save' the file.
This will close MegaTune.
On the main MegaTune2.25+ menu is an item called 'Settings/General'. You can set these as follows:
ANY NUMBER LARGER THAN 100 WILL PREVENT THE INJECTORS FROM FIRING. You must use a number LESS than the values below.
To convert the injector timing delay from the percentage used to crank degrees, multiply the injector timing delay percentage by these numbers:
So a value of 40% on a 6 cylinder gives an injection delay of 40%×120° = 48°. The injection will then occur at 48° after the tach event, or 48° - trigger offset (btdc).
Note this is a variable for injection start angle relative to the tach pulse (not necessarily TDC). The start of the fuel injection pulse width will begin at:
Tach time + InjStart % × predicted delta_t (between present and next tach pulse)
which is in crank degrees. When that time is exceeded in the main loop, MAP is grabbed, the pulse width is calculated, and fuel is injected in that sequence.
Now because MegaSquirt® does not do sequential injection (though the MS-II Sequencer™ controller will), it won't squirt at the same point in the engine cycle for all the cylinders connected to the same injector driver, but by moving the injection timing delay around you may be able to improve your idle. There is no simple calculation to come up with the best number for you to use. The general idea is to avoid injecting into an open exhaust valve. Since MegaSquirt® controllers use a banked injection system, then it would be better to move the timing on all the cylinders to a place where it avoids this on all cylinders (or as many as can be accommodated).
What you have to do is adjust the injection timing delay from 0% to about 80% and see which value gives you the best idle - as determined by the highest vacuum, or leanest AFR, or smoothest idle, or whatever else you are tuning for.
Of course there is a limit - you can't inject at say 98% of the next predicted tach pulse interval because there may not be time to calculate it all. Plus there is bit more fluctuation in fuel timing - NOT in the overall fuel pulse width, which will still be interrupt driven and exact, but in when the injection starts. This could vary by as much as a few milliseconds at low rpm, but the idea is that it is way better to inject within +/- a few ms of optimum than to consistently inject at a non-optimal value.
However, to ensure there is plenty of time to calculate the PW and start the injection, the fuel start time is limited to force it to occur at least 2 ms before the predicted next tach pulse. So if you look at a scope you will see the fuel pulse move right relative to the tach input as you increase InjStart %, but it will stop when it gets within 2 ms of the next tach in pulse, regardless of your increasing InjStart %.
Input Smoothing Factors Input Smoothing Lag Factors Lag factors force the variables to change more slowly than the actual input value. Note that in all cases, 100 is no lag effect at all, and smaller numbers slow the input response speed. The lag factors are used as follows:
NewValue = PreviousValue + (NewValue - PreviousValue) * (LagFactor/100%)
Sampling Rates: Reasonable values for tpsdotSample and mapdotSample are 25 ms for both. If you set mapdotSample and tpsdotSample both to 0, the program will try to sample tps and calculate tpsdot as fast as it can. This will make tpsdot vary all over the place from the tiniest variation in tps. And the same for mapdot. So keep the values reasonable, between ~10 and ~50.
The basic idea of IAC is that the motor or PWM solenoid starts out with a large opening of the air valve at cold startup, then gradually closes as the coolant temperature rises. The basic motor position at any given time is determined from the input table of step position versus coolant temperature. To this basic control algorithm, several features have been added as described below. You need to set MegaSquirt-II to tell it if you have a fast idle "solenoid type" valve, a PWM type valve, or a stepper motor IAC, or none of these. These are selected under Settings/Idle Control in MegaTune:
So, for example, if the motor last moved at 140°F, and the hysteresis is set to 5°F, then it won't move again until the temperature reaches 145°F. The setting prevent from moving the motor back and forth constantly, heating it unecessarily.
A value from 5°F to 10°F is good for most installations. This input can be used to avoid continuous motor motion (and wear) for small coolant temperature changes and random 'jitter' in the coolant temperature signal . Changes to the motor are only made when new coolant temperature > coolant temperature on the last move, or, new coolant temperature < (coolant temperature on the last move - Hysteresis temperature). What this does is allow constant motor motion while the coolant temperature is rising, but when it peaks, there will be no further motion unless things cool back down - which is unlikely.

The two spare port "T" pins (PT6 and PT7) are normally used to drive the stepper motor chip (IAC1,2). When you set pin PT6 high, it will make 1 of the 4 stepper output pins high and the other low, and no effect on the last two - which are controlled in the same way by pin PT7. So, by picking 2 of the 4 IAC outputs, you have two 12V spare pins that will directly drive about 0.5 Amps with no transistor needed. This is more than enough to drive a relay directly. If you are going to use port PT6 or PT7 as spares (IAC1,2), IdleCtl should be set to 0. This will keep the the stepper chip 'always enabled' and not turn it on and off, which would prevent the port from working as intended.
The pin on/off commands are set by pointers. When a user wants to use say an LED as a spare output, then the pointer is set to point to a dummy register in RAM (random access memory), and that's it. It's just like setting a jumper on the PCB to route a signal one way or another.
The spare pins have generic logic based on the values of up to two of the real time display variables. The user can specify these in MegaTune and they will be passed to MegaSquirt-II as offsets. The user can also specify:
Conversely, If you had injector specs that stated the opening time was 0.7 milliseconds at 14.5 Volts, and your battery correction was 0.20, then you should enter 1.0 as the 'Injector Opening Time'.
The optimal PWM current limit frequency is correlated with the inductance of the injector, resistance of the loop, and elapsed time/duty. The goal is to switch the injector current on and off without an appreciable change in *average* injector current - the current which holds the injector open. Faster PWM frequencies mean less current deviation. But since the injector is already held wide open (or should be) a faster PWM frequency will not hold it open any more than it already is.
A overall PWM setting above several kiloHertz (kHz) works based on most automotive injectors, and there is no advantage of running the frequency higher. In fact the higher switching will require a little more heat dissipation. Electromagnetic interference (EMI) with other circuits on MegaSquirt® is also an increasing possibility as frequency rises.
If you want to calculated the optimal period, then measure the injector inductance, and run it through the relation for inductor current:
I = (E/R)×(1-exp(-(R*t)/L))
When the inductor is charging, use the battery voltage for E, and when it is discharging use the voltage drop across the PNP Darlington, about 1.5 volts. You can then see the amount of current deviation based on PWM frequency.
If you want to measure this directly, install a low value resistor (like 0.05 ohms) in series with the injector and monitor the voltage drop across the resistor with a scope. You will then see the hold current and the deviations cased by frequency.
Alternatively, you can add resistors in series with the injectors. See the Injectors and Fuel Supply section of the MegaSquirt® manual for more details. To run low-impedance injectors with the PWM current limit mode, you need to set two parameters - the "PWM Current Limit %" and the "Time Threshold for PWM Mode" - both are on the €œConstants€ page. The current limit % is the percent duty cycle when the current limit is invoked. The time threshold is the amount of time from when the injector is first opened until the current limit is activated.
High impedance injectors can run on 12 Volts without problems. Low-impedance injectors require some form of current limiting. MegaSquirt® has pulse width modulation to limit the current. You need to set the PWM parameters to match your injectors:
Set the initial PWM% to 75% if and only if you have you impedance injectors and have NOT installed:
You will tune these after getting the engine running.
See €œSetting the PWM Criteria€ in the tuning section of the MegaSquirt® manual.
Failure to perform the tuning steps can result in damage to your injectors. If you have high-impedance injectors, set these values to 25.4 ms and 100%, and you do not need to tune them further.
| Fuel | AFR |
| Methanol | 6.4 |
| Ethanol | 9.0 |
| Gasohol (10% ethanol) | 14.2 |
| Gasoline | 14.7 |
| Propane | 15.7 |
With Alpha-N, you fill in a 6x6 table ('Other Tables/Alpha_N MAP table') that defines how the TPS is translated into a 'faked' MAP kPa that is then used with the 12x12 VE table.
So the ECU uses the TPS to look up the MAP in the 6x6 table (which should have TPS% ranging from 0% to 100%), then uses that to determine the fuelling based on the VE table. The advantage is that you can use different fuelling at different rpms (it also makes the blended MAP/alpha-N options possible).
Number of Cylinders | ||||||||||
| 1 | 2 | 3 | 4 | 5 | 6 | 8 | 10 | 12 | ||
| 1 | OK | simultaneous only | simultaneous only | simultaneous only | simultaneous only | simultaneous only | simultaneous only | simultaneous only | simultaneous only | |
| 2 | no | OK | no | OK | no | OK | OK | OK | OK | |
| 3 | no | no | simultaneous only | no | no | simultaneous only | no | no | simultaneous only | |
| 4 | no | no | no | OK | no | no | OK | no | OK | |
| 5 | no | no | no | no | simultaneous only | no | no | simultaneous only | no | |
| Number | 6 | no | no | no | no | no | OK | no | no | OK |
| of | 7 | no | no | no | no | no | no | no | no | no |
| squirts | 8 | no | no | no | no | no | no | OK | no | no |
| 9 | no | no | no | no | no | no | no | no | no | |
| 10 | no | no | no | no | no | no | no | OK | no | |
| 11 | no | no | no | no | no | no | no | no | no | |
| 12 | no | no | no | no | no | no | no | no | OK | |
"OK" means the combination will work with either simultaneous or alternating. "no" means it will not work with either, i.e., not at all.
There are a number of considerations in choosing the number of squirts:
More squirts are more likely to help if the engine:
However, if the engine is tuned so that the idle MAP is minimized (likely 13.5:1 AFR or so), and has a higher idle speed (say 800 rpm compared to 600 rpm), then more squirts is less likely to help.
There are definitely some down sides to more squirts:
So more squirts may help. They may not, however. And this can be a bandage for poor idle or accel tuning. So users should start with 2 squirt/alternating for port injection, and tune it as well as they can.
Then, if they can't solve some issues, they should try more squirts. But jumping straight to more squirts is probably not a good idea - most often it just masks the need for a richer idle mixture or more accel enrichment.
|
Example: Suppose you have a 4 cylinder 4-stroke engine. Then in 720° (two revolutions) you have 4 spark events (at 0°, 180°, 360° and 540°, then starting over at 720°=0°). MegaSquirt can only inject on an ignition event, so 1, 2, or 4 squirts/cycle for this engine.
If you have 2 squirts/simultaneous, you have:
but with 2 squirts /alternating, you have:
Both are two squirts per cycle, but alternating only has 1/2 as many total squirts per injector (i.e., since only one channel is active per squirt), so the pulse width must be doubled. 4 squirts/simultaneous would look like this:
There are 4x as many injection events with 4 squirts/simultaneous compared to 2 squirts/alternating, so the pulse width is just 1/4 as long (neglecting the opening times). The req_fuel calculator will show this - watch the top and bottom numbers as you make changes to the alt/sim and number of squirts. The top number stays the same (it is the 'unadjusted number' for 1 squirt simultaneous), while the bottom 'adjusted' number used for the pulse width calculations changes with the number of squirts and simultaneous/alternating. |
#unset MAPbaro
to:
# set MAPbaro
for going for MAP to MAP/baro (and unset if going from MAP/baro to MAP only, obviously). Otherwise the tables will not show on the menu (they will be grayed out).
MegaSquirt historically always includes the AFR in the calculation as part of the VE table, unless you have 2.8+ MS-II code, and have set the 'Use separate VE & AFR table' option under 'Fuel Set-Up/Other Fuel Settings'
The reason the AFR and VE tables were combined in the early codes is that they are tuned together. That is, you tune the VE table to get the AFR you want. So in practical terms, there was nothing to be gained by separating them, they would do the same thing (and eat up more memory). This was before wide band sensor were widely available.
When wide band sensors became popular and relatively cheap, the AFR table was invented to set targets for the wide band sensor, and nothing else. So it affected fuelling 'after the fact' in the ego correction, but was NOT used in the initial fuel pulse width calculation. In this case, setting the VE to the 'true VE' would result in ego correction trying to reach the AFR target. But if you wanted EGO correction to be minimal, you would still put VE*AFR in the VE table.
However, it was realized that there was some educational value in separating out the AFR and VE tables, since these are both real physical quantities, and it helps to understand how the engine is working if both quantities appear in the fuelling equation. So using 'separate VE & AFR table' takes the AFR table from an EGO correction to act as both ego correction AND a part of the initial fuel calculation. In this case, the 'true VE' would go in the VE table, the desired AFR goes in the AFR table, and the EGO correction should be minimal (assuming everything else is correct, of course).
Fuel Response Time (cyclic): This is a tool for experimental determination of how a change in fuelling propagates through the system. Additional fuel added (in milliseconds) to normal fuel pulse width for the 'number of injections', which is repeated every 'time between added fuel' in seconds. The idea is that there is a step function in the fuelling (with no other changes). This will help in determining the X-Tau settings, as well as the EGO sensor response time. The amount of time for the EGO sensor to respond to the fuel impulse is dependent on both the transport time (a function of rpm) and the sensor response time.
Nitrous Control (switched by E0 low): The N2O enrichment input is a percentage which multiplies the Δtime between tach pulses. This provides a fixed fuel flow rate for the constant N2O flow rather than a fixed pulse width. Since the same variable is also used for the fuel response test impulse, which is in milliseconds, a change in the settings.ini file is required if you want to use N2O enrichment.
You expose the nitrous menu (under 'Other fuel settings/Additional Fuel') by going into the settings.ini file in your project's /mtCfg/ sub-folder and changing the default setting from fuel response determination (#unset n2o) to the nitrous setting (#set n2o):
find:
#unset n2o ; choose between n20 enrichment (=set) and PW impulse (=unset) triggered by PE0 (affects menus)
and change it to:
#set n2o ; choose between n20 enrichment (=set) and PW impulse (=unset) triggered by PE0 (affects menus)
Then whenever PE0 (the JP4 jumper on MS-II™ itself) is pulled low (grounded by the nitrous switch) the specified percentage of fuel will be added (this will work best with a one-stage system, of course!). The specified amount of ignition retard (up to 25.5°) will also be applied.
Make sure you test this by seeing what it does to the pulse width before you use this with nitrous.
These parameters define the closed loop behavior of MegaSquirt. You must have a either a narrow band or wide band EGO sensor/controller that will work with v2.8 of controller code. To disable closed loop operation altogether, set the EGO Step value to zero.
Dual Sensors: The dual lambda sensor feature has been in the MS-II code since V1.0. You connect the second sensor to the ADC6 input with appropriate circuitry and it adjusts the PW2 output independently of PW1. You connect the second sensor to the JS5 hole (on a V3 main board) - X7 on a V2.2 main board, duplicating the R10, R11, C10 circuit from the v3.0 PCB in the proto grid area. There is only one calibration because it is assumed you are going to use the same type of sensor on each side. If there is a small difference, you can compensate for it in the separate AFR target tables.
From the time the processor commands the injector to open to the time you get a valid feedback from the O2 sensor, the following has to happen:
The control algorithm used in the processor takes into account that there will be a delay between injecting more fuel and getting back a reading and then injecting more or less fuel based on that reading. It can calculate the time between injections, so you don't have to be concerned with that. But it does need the sensor + transportation delay because it has no way of calculating that. If that delay is even the least bit longer than 1 injection cycle, you have to wait for the next cycle to correct.
The equation used looks like this:
delay (ms) = Kdly1 + Kdly2*120000 / (map(kPax10)*rpm)
It assumes you have a measured transport delay at a fixed rpm and map value, e.g, at idle, and you can put the specific rpm, map and measured delay into the equation and you get out a program input (KDly2) needed by the MS II code to approximate the transport delay at any arbitrary rpm and map. Kdly1 is the sensor response delay and include the averaging done by whatever wide band sensor interface system you are using. You could get some idea of the K2 delay by estimating exhaust flow velocity and measuring pipe/ port lengths or by maybe using a spare port to energize a solenoid to squirt a small single shot of extra gas into the intake at a fixed time. You then datalog everything and measure how long it took from the time the solenoid was energized to when the extra gas showed up on the AFR reading. These factors are shown in MegaTune/TunerStudioMS as:
So if you are connecting a MAF (and not using MAP), disconnect (remove) the MAP sensor, and connect the MAF signal wire to pin#1 of the MAP sensor pad (it is the square one). Ignore the knock and baro pins (or use them for knock or baro, etc.)
The VE tables are not used when MAF only is selected, because MAF measures the actual mass air flow. The rpm and map arrays for AFR are the same as those for VE because both are fuel related. Also see: www.microsquirt.info/mafmap.htm#ms2
Because the coil ringing is mostly a function of time (not the interval between firings), the time mask is usually most effective in preventing false triggering (and the resultant tach spikes) when firing off the coil's negative terminal if the dwell is constant. However, the dwell is always constant (because of cranking, or because the engine is running fast enough that there isn't enough time for full dwell), so the percentage mask can be helpful as well.
Note that unlike the next pulse tolerances below, the masking is designed to prevent false triggering that would create additional tach events that were false. The next pulse tolerances are designed to 'catch' errors and adjust the tach/tooth count (or reset the ignition) when an error occurs.
For wheel decoding an M-N crank wheel you must use values close to 0.2 ms and 10%. However, to not break any existing setups, the default values are 0 and 50%, the same values that are 'hardwired' into pre-v2.5 code. Be sure to adjust these values when you set up for a trigger wheel (note that they are in a separate dialog from the trigger wheel settings).
The next pulse tolerances are designed to 'catch' errors and adjust the tach/tooth count (or reset the ignition) when an error occurs. Note that unlike the next pulse tolerances, the time and percentage masking above is designed to prevent false triggering that would create additional tach events that were false.
So if the time between the last two events is X, then if then next pulse occurs within X-PulseTol, it is rejected as a false trigger. If a pulse is NOT received after X+PulseTol, a tooth is assumed to have been missed. This only occurs after the first few pulses (as specified in the Skip Pulses). In later versions of the MS-II code, the next pulse tolerance can be set under three different conditions:
| Bin | Voltage (V) | Duration (ms) | Comment |
| 1 | -4.0 | 2.0 | Increases dwell by 2.0 milliseconds at 8.0 Volts |
| 2 | -2.0 | 0.9 | Increases dwell by 0.9 milliseconds at 10.0 Volts |
| 3 | 0.0 | 0.0 | No compensation is applied at 12.0 volts |
| 4 | 2.0 | -0.5 | Decreases dwell by 0.5 milliseconds at 14.0 Volts |
| 5 | 4.0 | -0.9 | Decreases dwell by 0.9 milliseconds at 16.0 Volts |
In general, you should have small positive numbers in the negative bins, and small negative numbers in the positive bins. DO NOT rearrange the order of the voltage bins.
The -4.0 and -2.0 bins are useful for generating a good 'hot' spark for cranking. Note that normal running voltage is often about 14 volts, which in this case would remove 0.5 milliseconds. Be very careful not to put overly large numbers in these bins. You engine may now run at all or may run poorly with large negative numbers, and may burn out the coil with large positive numbers.
Note that you should change these parameters only with the engine OFF (or the stim rpm at no more than 300 rpm).
The missing tooth code uses the teeth of the missing tooth crank wheel to create 'tach teeth'. That is, it creates a tach signal from a particular tooth, then skips a number of teeth before declaring another tooth a tach signal. This means that all the tach teeth must correspond to real teeth. For a four stroke cycle engine, this means that the total number of teeth, including missing ones, must be evenly divisible by ½ the number of cylinders (or by the number of cylinders for a 2-stroke).
There is more information on the trigger wheel usage in the missing tooth trigger wheel decoder page.
The trigger wheel settings are:
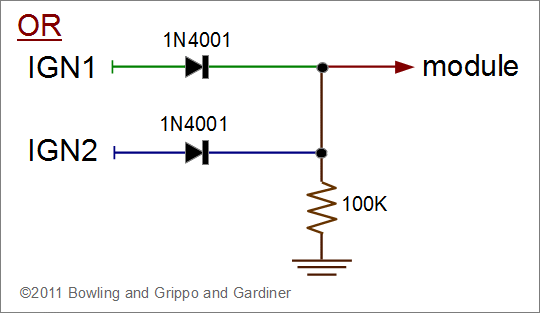
If you set this to zero (like a Mazda KLDE 6-0 crank wheel, for example) then you must choose one of the dual spark options to recognize the cam sync signal:
If you have a single ignition module (like the KLDE), and your module requires a high signal for the dwell period, you must then tie the dual outputs together with a logic 'OR' circuit. The circuit will prevent the ignition outputs from short-circuiting the processor outputs when one is trying to pull the signal high, and the other is trying to pull the signal low. This is done with a 'forward' diode on each output. 1N4001 diodes, or similar, will work fine. The banded end of the diode goes on the module side of each ignition output, a 100K &Ohm; resistor is used to pull the signal to ground, then the wires are joined and connected to the module's spark input.
Here is a schematic of a logic OR circuit (high if either IGN1 or IGN2 are high, low otherwise; use if the dwell period of the signal for the ignition module needs to be high):
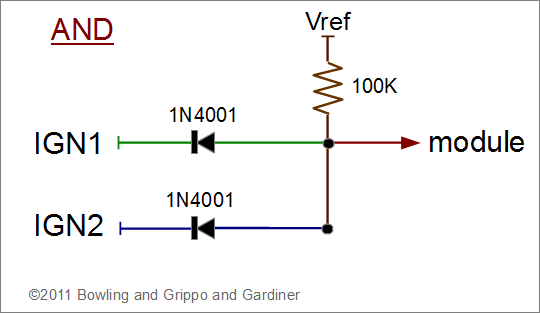
Here is an schematic of a logic AND circuit (high only if both IGN1 or IGN2 are high, low otherwise; use if the dwell period of the signal for the ignition module needs to be low):
There is more on tieing the IGN outputs together here: www.microsquirt.info/dualspark.htm
Note that the cam input and second ignition output only come on MicroSquirt® controllers, though in theory it is possible to add them to a V3 main board with some DIY work.
Note that an N-0 wheel can also be run in (crank wheel) wasted dual spark mode with a Rising/Falling crank synch - these are the last dual spark 2 modes ('N-0 Wheel w/ Falling Crank Sync' or 'N-0 Wheel w/ Rising Crank Sync').
            ...----|<------ degrees between firings -------------->|----...
            ...----|--------------|--------------------------------|----...
            ...- tach1-----------TDC-----------------------------tach2 -...
            ...----|<--(+)x deg-->|<------(-)y deg---------------->|----...
For non-Dual Spark function, it doesn't matter which offset you choose because the dwell + spark sequence for a cylinder can be anywhere in the cycle, and we have generally used positive (+) degrees in the documents. But for Dual Spark, because it is too complicated and there is not enough RAM or CPU time, you must start and finish both dwell and spark within the time between 2 consecutive tach pulses. In this case we always want to use the negative y degrees, or else the math ends up coming out incorrect in the code.
For example, if tach1 occurs at a trigger offset of +40° BTDC, tach2 occurs -320° ATDC (and there is 360 degrees between firing, so a 2 cylinder engine). For dual spark mode we always want a negative trigger offset, so you would use -320° instead of +40°.
The -320° offset seems unusual, but there is a reason for it. The original code started with a very robust triggering system where people could put their sensors anywhere and use any kind of advance with any kind of offset. This was a nightmare to code and impossible to maintain with the dual spark system, which was based on a strictly next cylinder firing setup. In fact it sets up to fire 2 cylinders before the actual spark occurs. This allows plenty of time for dwell at high rpm. To maintain the previous terminology for users as well as keeping the code consistent, the advance offset was left as it was, but whereas for the original (non-dual spark) system it was best to use a positive trig offset (but negative offsets would also work), while dual spark requires a 0° to negative (ATDC) advance offset.
If you try to put in -320° offset in some older MegaTune ini files, it won't allow it, so use the latest 2.8 ini file which opens up the limits to +/359°.
For more info on the Dual Spark options, see this page: www.microsquirt.info/dualspark.htm
All interpolation in MegaSquirt® uses table end points (NOT extrapolation) when the indexing value exceeds the limits of the table, but that fact is especially important when considering the computations of volumetric efficiency from the VE table. This means that if your biggest MAP bin contains 100%, then any MAP value over this will produce 100% (for a given RPM). This does NOT mean that the pulse width will be the same for MAP readings of 100 kPa and 200 kPa, the MAP value is used to scale the pulse width accordingly, so for this example you will get twice as much fuel.
To clarify how all these factors are used, the basic pulse width calculation (containing no enrichments, etc.) is.
Volumetric efficiency is a function of many factors (intake and exhaust tract design, camshaft lobe shape, and so on) but can be characterized very well for a given engine by MAP and RPM. I could go on about resonance and laminar flow, but it is sufficient to say that at low MAP (30 kPa), the VE is typically very poor due to turbulence effects, so VE is low (maybe 10-30%). At the MAP values 100 kPa and higher, the torque curve is a close reflection of the VE curve, so expect the VE values to peak at about the same point.
Very Important Note The VE values in MS do not reflect the true VE in your engine, since you usually do not want to run stoichiometric combustion in all operating regimes! They are a combined value giving the VE multiplied by any enrichments or enleanments that you desire. When your turbo motor is running at 250 kPa and has a true VE of 100% at 14.7:1 AFR, you would enter 111% to get 13.2:1 AFR.
The Required Fuel value determines the ideal pulse width at 100% VE. The entries in this table scale that value to determine the actual pulse width (neglecting all correction factors and enrichments). As such, both the required fuel and the VE table entries are more or less arbitrary, but it is useful to make them as close to correct as possible. In other words, if your required fuel value is 15.0 ms and the VE table entry being used is 100%, you could achieve the same pulse width with 10.0 ms and 150%, respectively. It is also important to understand that these VE values do not indicate the amount of fuel delivered over time. For example, if you have a row in the table that is 100% across the board, then fuel delivered is proportional to RPM. Say that the engine is running at 2500 RPM and the pulse width is 12.0 ms. If you speed the engine up to 5000 RPM the pulse width will remain at 12.0 ms, but this delivers twice as much fuel because there will be twice as many injection events in a given time interval.
The MAP bins define the range over which you can vary the VE values used for pulse width calculations. These values are in kPa (absolute) and can vary from 0 to 255 kPa; usually 0 to 100 for a naturally aspirated motor and 0 to max boost on a turbo- or supercharged one. The biggest value might be 100%, even for a turbo motor, IF you want the fuel at boost to be linearly proportional to MAP. Typically, though, you want some values above the 100 kPa value to add fuel as coolant when boosting. This might result in a table that looks like this: MAP VE (%) ... 100 80 150 100 200 100 250 120 4000 RPM to ensure that extra fuel is delivered when boost is applied. The low MAP bin value should be around 20 kPa for a stock type engine and the top value should be around the maximum pressure that you expect your engine to see (100 kPa for naturally aspirated engines, somewhat over max boost on a turbo- or supercharged motor to give yourself some headroom). The MAP bin values are stored in MegaSquirt® as "KPARANGEVE."
The RPM bins define the range over which you can adjust VE based on engine speed. If you have a representative torque curve for a motor like yours (ideally from a dyno run, but probably nearly as good from one of the many engine simulation packages available), you can set the spacing of these values from that. Find the places on the graph where the curve is "bending" the fastest (i.e., has big second derivatives; usually from idle to up near the torque peak) and use smaller RPM intervals over these. For long stretches where the curve is straight, but not necessarily horizontal, you can use bigger gaps in the bins. The reason for this is that the algorithm is going to do linear interpolation between these points (that is, it is going to play connect-the-dots), so you will have smaller error between bin points if you choose them well. It is usual to have the low end of the torque curve well represented, down to idle, and the top end should be somewhere near your redline value. For a street engine, the torque curve is usually dropping rapidly at redline, dictating that you have that top value up near redline. On a race motor, you are much nearer the torque peak, so will probably group the RPM bin values more tightly up there for finer control over the range of interest. The RPM bin values are stored in your MegaSquirt® controller as "RPMRANGEVE".
These constants are derived from the:
1. Inputs Fill in all of the values (use your best estimate if you don't have measured numbers, but remember your table will only be as good as your estimates, and sometimes quite a bit worse).
3.
Verify
Note that you can export or import VEX files into any of these tables. Use the 'Table/XXX Table/Files/VE Table Import' to import them, 'Table/XXX Table/Files/VE Table Export' to export them. These are all saved in the VEX format, so be sure to give your saved files descriptive names. The table will import VEX files of different sizes and automatically adjust them to match the current table size.
This is the total spark advance (before top dead center) you want at a given rpm and MAP. That is, it includes the effect of the trigger offset. IAT, cold advance, and other adjustments are made to these table values. The values are interpolated between cells. For info on how to set up the advance table, see: www.megamanual.com/begintuning.htm#advance and www.megamanual.com/ms2/tune.htm#spark
So the ECU uses the TPS to look up the MAP in the 6x6 table (which should have TPS% ranging from 0% to 100%), then uses that to determine the fuelling based on the VE table. The advantage is that you can use different fuelling at different rpms (it also makes the blended MAP/alpha-N options possible).
If you want basic alpha-N with the fuel dependent only on throttle position, just make the 6x6 tables equal the TPS% all the way across each row. Note that the default values might not be appropriate (they may be used to store other variables in some cases).
The baro correction is implemented as follows:
barocor = baro correction from 2-point table + baro correction from new 6-point delta correction table
Originally the MS-II code had a standard equation from the OEMs, and the 2 points in it were really just to calibrate the sensor being used. But some users said it was way off, although no one ever gave us a table of data that said, "I drove from this altitude to that altitiude at steady speed and load and this is what my wideband did vs the baro readings". So we added a 6 point table that was meant to force you to drive from altitude A to B and record baro and AFR at 6 points and then put the % delta correction into the new 6 point table. This should allow anyone to tune baro as perfectly as humanly possible. But for those who don't care about baro correction, the defaults for the 6 correction points are 0%, so nothing would break when using their previous setup.
The realtime display (sometimes called the 'runtime display') shows the values of the tuning and control parameters inside the MegaSquirt® controller in real time.
Time (s)
Time in seconds since MegaSquirt® last booted ("secl"). This value is derived from the 8-bit
seconds value in the internal MS clock, and will therefore only display
values from 0 to 255 (it wraps around to zero when it hits 255). If
the time wraps around before hitting 255, a reset has occurred, and this
will be noted on the front page status bar. Note that with MegaSquirt-II, the datalogs will show secl continuing to climb above 255 (up to 65536), this is normal.
Barometer (kPa and
in/Hg)
The barometric pressure as measured by
MegaSquirt. Currently this is a static value determined at startup.
Returned by MegaSquirt® in "baro" as a raw ADC count.
O2 (v)
This is the voltage detected on the EGO sensor if on
is installed. For narrow band sensors this ranges from 0-1 v and typical
wideband sensors have a voltage range of 0-5 v.
Coolant (F)
The value reported by the coolant temperature sensor. By default, it has a maximum of 215°.
Batt (v)
Current battery voltage as measured inside
MegaSquirt. If this number looks lower than actual battery voltage
(probably 14.0 v or higher), then you may not have big enough wires
running to MS; put a voltmeter across the wires from the board to their
source in your vehicle's wiring loom (should be less that 1 v, a lot
less). Returned from MS as a raw ADC count in "batt."
TPS (v)
Throttle position in volts. Most TPSs don't range
all the way from 0 to 5 v, so don't be alarmed if yours only goes from 1.5 to 4.4 Volts as
this is normal. The nominal TPS value itself is generally not interpreted
in an absolute way, but rather the rate of change in TPS is what is used
for acceleration enrichment. However the value of ~3.5 volts is used
to denote "flood clear" mode; i.e., if you hold the throttle down past the
3.5 volt level (the voltage from the TPS) when cranking, the pulse width is cut back to 0.3
milliseconds. Returned from MS as the variable "tps" in a raw ADC count.
GammaE
Gamma is the total enrichment factor, computed by
MegaSquirt® taking into account all of warmup, acceleration/deceleration,
barometric, and manifold air temperature sensor correction factors, but excluding EGO correction, which is handled separately
(See Corrections/Enrichments, below.) Returned from MS as a percentage
value in "gammae".
MAP (kPa)
The manifold absolute pressure as seen by MegaSquirt®
in kiloPascals. Returned in MegaSquirt® "map"
as a raw ADC count, converted in MegaTune using a hard-coded transfer
function.
MAT (F)
The raw temperature of the air at the Manifold Air
Temperature sensor. Used in conjunction with MAP to compute manifold air
density. (See note on Coolant temp, above.) Returned by MegaSquirt® in "mat" as a raw ADC count.
RPM
Engine speed in RPM. If this is jumping around in an
unpredictable manner, you probably have a poor ignition signal input to
MegaSquirt. It is returned from MS as RPM/100 in the variable "rpm."
Pulse Width (ms)
The injector pulse width being used by MegaSquirt® to
squirt fuel into your motor. Reported as 10xPulse width in the MegaSquirt®
variable "pw".
IAC DC (%)
If a PWM Idle valve is selected, this is reporting
the PWM percentage applied to the valve (0 to 100%). If a stepper motor
IAC is selected, it reports the total number of steps made to extend the
pintle, with 0 being the start value.
Corrections/Enrichments (percent)
This part of the realtime display shows all the
individual correction factors used to compute gamma and the resulting
pulse width.
EGO
This is the correction factor computed from O2 sensor
readings. Returned as a percentage by MS in "egocorr". See "Exhaust Gas Oxygen" on the
Enrichments page, below, for parameters to modify MegaSquirt's computation
of this factor.
Barometer
A barometric correction is applied, based on the
initial MAP sensor reading. Returned in "barocor" by MegaSquirt.
Warmup
The warmup
correction factor applied due to startup and coolant temperature status.
Returned in "warmocor" by MegaSquirt. See
"Warmup Enrichment Bins" to modify the computation of this factor.
Air Density
Air density correction is computed from MAT. This
value is returned from MegaSquirt® in "aircor".
Volumetric
Efficiency
The current computed VE value
determined by look up in the VETABLE using RPM and MAP. Reported in "vecurr" by MegaSquirt.
Acceleration
Unlike all the other corrections here, the
acceleration enrichment is an additive factor; take the result of all the
above multiplied through, then add this one on. Returned from MegaSquirt®
in "tpsaccel".
Runtime Messages
This message is a decoded version of the MegaSquirt®
engine status variable "engine." Possible status values are
(these are their names in the controller code megasquirt.h and
megasquirt.asm):
This window enables you to tune the VE table 'on the fly'. On the left are a number of gauges, and on the right are two items - a graphical representation of the VE table at the top, and a status box at the bottom.
Cursor
The "cursor" is the red cross on the tuning RPM vs MAP graph on
the right half of the screen. The values corresponding to the current
cursor position are displayed in the status window in the same color as
the cursor. These represent the values that will be changed when the
shift-up/down arrows are pressed.
Spot
The "spot" is the green dot specifying current engine operating
position in the VE graph. The numeric values corresponding to the spot are
displayed in green in the status window.
Keystrokes
To navigate the VE map on the right of the Tuning screen, use the arrow keys move the tuning cursor, up moves up on the MAP axis of the grid and down moves to a lower MAP bin. If you know VI, then you can alternatively use the standard motion keys from that editor; use "k" to go up, "j" to go down, "h" to go left and "l" to go right. Left and right arrow keys move to the higher and lower RPM bins, respectively.
The shifted up and down arrow keys richen or lean the VE table bin at the cursor. Alternatively, the "q" key richens the currently selected bin and "w" leans it. Whenever you change a value in MegaTune, it is immediately changed in the MegaSquirt® controller's RAM. These changes will go away when you turn off the engine if you do not save them into flash memory by typing "b" for "burn to flash."
You can also easily modify the required fuel value on the tuning screen. Hold both shift and ctrl down while typing up and down arrow keys, each keystroke will change the value up or down by 0.1 ms.
You can rotate the grid so you can see the values better on the 3D window more clearly. Hit the "m" and "n" keys and see what happens. Once you find an orientation you like, copy down the numbers that are displayed in the status window and you can set those as your defaults in the base ini file:
gridOrient = 250, 0, 340 ; Space 123 rotation of grid in degrees.Tools/Autotune
Autotune is an algorithm built into recent releases of MegaTune that automatically tunes your VE table based on EGO feedback. It is similar to MSTweak3000, but operates in real-time, without a datalog, and on any variant of code and processor that uses MegaTune.
The VE value inside MegaSquirt's RAM memory is modified and your engine feels the effect immediately, but it is not burned to flash and made 'permanent' until you click "Burn Table". If you do not burn the table, the changes will be lost the next time the power is cycled on MegaSquirt.
With a narrow band sensor, you can use auto-tune with any algorithm and any sensor to tune the low-power part of the table, it will get you to stoich (or AFR targets) quite nicely, which will give you a starting point from which to extrapolate the high-power part.
You don't need a dynomometer to get the high output regions of the VE table done, but you definitely should NOT use auto-tune with a narrow band sensor for that part of the table, you'll end up with broken or melted pistons. In order to use auto-tune for WOT tuning, you must be running a wide band lambda system (sensor and controller), with an appropriate EGO correction algorithm that allows you to set specific AFR targets (i.e., MS-II). If one of these requirements is missing, then you must rely on seat-of-the-pants and experience.
To enable autotune, select 'Tuning/VE Table1/Tools/Autotune'. An autotune status text indicator will appear in the message window in the lower right corner of MegaTune. Note that auto-tune updates the VE table in RAM, and requires that you click "Burn" to save the changed VE table permanently.
Beware that if you go so rich that you start to see misfires, the lambda sensor will read the unburned mixture as dead lean (since unburned oxygen is present) and the closed loop algorithm will attempt to add fuel, which the auto-tune algorithm will detect and adjust the VE bin richer, thus making a bad situation worse. Use with caution, auto-tune will not perform magic!
Typically, acceleration enrichment and decceleration enrichment happen while the engine RPMs are changing quite rapidly, and they usually turn off EGO correction at the same time, pretty much negating those two conditions.
To start with, set the EGO step size (in MegaTune) to 1%, and set the authority down to ~10%, so that auto-tune doesn't do unstable jumps. The default auto-tune gain is 50%, so if you could jump a VE entry by as much as 5% in a single operation with the above numbers.
The EGO control algorithms all turn off correction (i.e., set the correction factor to 100%) whenever AE, decel, warmup or any number of other enrichment types come active. The 100% EGO value in turn has the effect of turning off the auto-tune.
The EGO correction step doesn't come into play at all, that's only internal to the EGO algorithm itself and dictates how rapidly it moves when correcting. The auto-tune step is determined by the current EGO correction (which is limited by the EGO controller authority), and the proportional gain, so only those two values really play a role in computing how big the auto-tune step will be. So, things proceed like this:
There are a number of parameters that affect the operation of auto-tune. These are written into the custom.ini file:
The radius (or vertex tolerance parameters) is how near to a vertex the operating conditions must be before the VE will be adjusted. For example, with the above settings, auto-tune will adjust a vertex if the operating point is within 200 RPM and 7 kPa of that vertex. If you increase the radius parameters, which would allow tuning farther from a vertex, then you may be changing the wrong vertex (typically four are involved at any given time, but auto-tune only changes the nearest one). The radius parameters try to minimize this error by only tuning when the nearest vertex has overwhelming influence.
For the limits (or tuning block parameters), "X" is RPM. Y is normally MAP, TP or load. Z is the VE itself. The limit parameters box the tuning points, no changes will be made outside the box. The radius parameters dictate how close the operating point must be to the tuning point for auto-tune to operate, if the operating point falls outside this smaller box, then no action is taken. If you change the limits, then you don't change the accuracy or speed, just the region that is valid for tuning.
Initial startup interval is the time in seconds between when the operating point approaches a tuning point and when the first adjustment is made.
The update interval is the time between each subsequent adjustment.
Note: If the interval parameters are made too short, the algorithm will become unstable and oscillate, since the EGO signal has some latency: you change the pulse width, which a cycle later causes the combustion mixture to change and then depending on the volume of pipe between the cylinder and the EGO sensor, there is some delay before the change is sensed. So you don't want to make these too short, you must allow enough time for the system to react and stabilize.
Proportional gain is how much of the ego correction is used to adjust the VE value. If you set it to 1.0, and the ego correction indicates a 15% error, then the VE will be adjusted by 15%, while gain of 0.5 will adjust VE by 7.5%. I'd suggest keeping this at 0.5 or lower.
Lumpiness is a parameter to limit how far a vertex's VE can be adjusted. The example below will keep the vertex that is being tuned within 5% of the extremes of the four surrounding vertices, under the assumption that the table should be somewhat smooth and will be 'rough tuned' to start. Note that the limits are transient, so if auto-tune changes vertex A by +5%, then moves to adjacent B, which also goes +5%, then the limit when we return to A will now be 5% above B.
[AutoTune]
   table = veTable1Map
      lumpiness = 5 ; percent
There are two diagnostic messages to tell you what is going on with the auto-tune algorithm when it is turned on, but isn't doing any tuning. They are:
Note that there are no menus to configure auto-tune in MegaTune (other than the EGO parameters). All the other data that MegaTune displays in dialogs for you to edit is stored somewhere inside your MegaSquirt; the tuning parameters for auto-tune are just MegaTune-specific data and really have nothing to do with MegaSquirt. This means that you need to edit the custom.ini file to make changes to the tuning algorithm's parameters. You may have to add to the custom.ini file:
;-------------------------------------------------------------------------------
; Add your customizations here, they will be read at the end of the
; standard megatune.ini processing and override any settings there.
;-------------------------------------------------------------------------------
[AutoTune]
table = veTable1Map ; Should be the map3d_id of a TableEditor entry.
allowAutoTune = on
corrector = egoCorrection

; Vertex tolerance parameters
xRadius = 200 ; RPM
yRadius = 7 ; MAP

; Tuning block parameters
xLimits = 1500, 4000 ; RPM
yLimits = 60, 90 ; MAP
zLimits = 10, 200 ; VE

; Controller parameters
initialStartupInterval = 1.0 ; seconds
updateInterval = 1.0 ; seconds
proportionalGain = 0.5
lumpiness = 5 ; percent
This window enables you to tune the second VE table in dual table mode 'on the fly'. On the left are a number of gauges, and on the right are two items - a graphical representation of the VE table at the top, and a status box at the bottom.
Cursor
The "cursor" is the red cross on the tuning RPM vs MAP graph on
the right half of the screen. The values corresponding to the current
cursor position are displayed in the status window in the same color as
the cursor. These represent the values that will be changed when the
shift-up/down arrows are pressed.
Spot
The "spot" is the green dot specifying current engine operating
position in the VE graph. The numeric values corresponding to the spot are
displayed in green in the status window.
Keystrokes
To navigate the VE map on the right of the Tuning screen, use the arrow keys move the tuning cursor, up moves up on the MAP axis of the grid and down moves to a lower MAP bin. If you know VI, then you can alternatively use the standard motion keys from that editor; use "k" to go up, "j" to go down, "h" to go left and "l" to go right. Left and right arrow keys move to the higher and lower RPM bins, respectively.
The shifted up and down arrow keys richen or lean the VE table bin at the cursor. Alternatively, the "q" key richens the currently selected bin and "w" leans it. Whenever you change a value in MegaTune, it is immediately changed in the MegaSquirt® controller's RAM. These changes will go away when you turn off the engine if you do not save them into flash memory by typing "b" for "burn to flash."
You can rotate the grid so you can see the values better on the 3D window more clearly. Hit the "m" and "n" keys and see what happens. Once you find an orientation you like, copy down the numbers that are displayed in the status window and you can set those as your defaults in the base ini file:
gridOrient = 250, 0, 340 ; Space 123 rotation of grid in degrees.
Autotune is an algorithm built into recent releases of MegaTune that automatically tunes your VE table based on EGO feedback. It is similar to MSTweak3000, but operates in real-time, without a datalog, and on any variant of code and processor that uses MegaTune.
The VE value inside MegaSquirt's RAM memory is modified and your engine feels the effect immediately, but it is not burned to flash and made 'permanent' until you click "Burn Table". If you do not burn the table, the changes will be lost the next time the power is cycled on MegaSquirt.
With a narrow band sensor, you can use auto-tune with any algorithm and any sensor to tune the low-power part of the table, it will get you to stoich (or AFR targets) quite nicely, which will give you a starting point from which to extrapolate the high-power part.
You don't need a dynomometer to get the high output regions of the VE table done, but you definitely should NOT use auto-tune with a narrow band sensor for that part of the table, you'll end up with broken or melted pistons. In order to use auto-tune for WOT tuning, you must be running a wide band lambda system (sensor and controller), with an appropriate EGO correction algorithm that allows you to set specific AFR targets (i.e., MSnS-Extra or MS-II). If one of these requirements is missing, then you must rely on seat-of-the-pants and experience.
To enable autotune, select 'Tuning/VE Table1/Tools/Autotune'. An autotune status text indicator will appear in the message window in the lower right corner of MegaTune. Note that auto-tune updates the VE table in RAM, and requires that you click "Burn" to save the changed VE table permanently.
Beware that if you go so rich that you start to see misfires, the lambda sensor will read the unburned mixture as dead lean (since unburned oxygen is present) and the closed loop algorithm will attempt to add fuel, which the auto-tune algorithm will detect and adjust the VE bin richer, thus making a bad situation worse. Use with caution, auto-tune will not perform magic!
Typically, acceleration enrichment and decceleration enrichment happen while the engine RPMs are changing quite rapidly, and they usually turn off EGO correction at the same time, pretty much negating those two conditions.
To start with, set the EGO step size (in MegaTune) to 1%, and set the authority down to ~10%, so that auto-tune doesn't do unstable jumps. The default auto-tune gain is 50%, so if you could jump a VE entry by as much as 5% in a single operation with the above numbers.
The EGO control algorithms all turn off correction (i.e., set the correction factor to 100%) whenever AE, decel, warmup or any number of other enrichment types come active. The 100% EGO value in turn has the effect of turning off the auto-tune.
The EGO correction step doesn't come into play at all, that's only internal to the EGO algorithm itself and dictates how rapidly it moves when correcting. The auto-tune step is determined by the current EGO correction (which is limited by the EGO controller authority), and the proportional gain, so only those two values really play a role in computing how big the auto-tune step will be. So, things proceed like this:
There are a number of parameters that affect the operation of auto-tune. These are written into the custom.ini file:
The radius (or vertex tolerance parameters) is how near to a vertex the operating conditions must be before the VE will be adjusted. For example, with the above settings, auto-tune will adjust a vertex if the operating point is within 200 RPM and 7 kPa of that vertex. If you increase the radius parameters, which would allow tuning farther from a vertex, then you may be changing the wrong vertex (typically four are involved at any given time, but auto-tune only changes the nearest one). The radius parameters try to minimize this error by only tuning when the nearest vertex has overwhelming influence.
For the limits (or tuning block parameters), "X" is RPM. Y is normally MAP, TP or load. Z is the VE itself. The limit parameters box the tuning points, no changes will be made outside the box. The radius parameters dictate how close the operating point must be to the tuning point for auto-tune to operate, if the operating point falls outside this smaller box, then no action is taken. If you change the limits, then you don't change the accuracy or speed, just the region that is valid for tuning.
Initial startup interval is the time in seconds between when the operating point approaches a tuning point and when the first adjustment is made.
The update interval is the time between each subsequent adjustment.
Proportional gain is how much of the ego correction is used to adjust the VE value. If you set it to 1.0, and the ego correction indicates a 15% error, then the VE will be adjusted by 15%, while gain of 0.5 will adjust VE by 7.5%. I'd suggest keeping this at 0.5 or lower.
Lumpiness is a parameter to limit how far a vertex's VE can be adjusted. The example below will keep the vertex that is being tuned within 5% of the extremes of the four surrounding vertices, under the assumption that the table should be somewhat smooth and will be 'rough tuned' to start. Note that the limits are transient, so if auto-tune changes vertex A by +5%, then moves to adjacent B, which also goes +5%, then the limit when we return to A will now be 5% above B.
[AutoTune]
   table = veTable1Map
      lumpiness = 5 ; percent
There are two diagnostic messages to tell you what is going on with the auto-tune algorithm when it is turned on, but isn't doing any tuning. They are:
Note that there are no menus to configure auto-tune in MegaTune (other than the EGO parameters). All the other data that MegaTune displays in dialogs for you to edit is stored somewhere inside your MegaSquirt; the tuning parameters for auto-tune are just MegaTune-specific data and really have nothing to do with MegaSquirt. This means that you need to edit the custom.ini file to make changes to the tuning algorithm's parameters. You may have to add to the custom.ini file:
;-------------------------------------------------------------------------------
; Add your customizations here, they will be read at the end of the
; standard megatune.ini processing and override any settings there.
;-------------------------------------------------------------------------------
[AutoTune]
table = veTable1Map ; Should be the map3d_id of a TableEditor entry.
allowAutoTune = on
corrector = egoCorrection

; Vertex tolerance parameters
xRadius = 200 ; RPM
yRadius = 7 ; MAP

; Tuning block parameters
xLimits = 1500, 4000 ; RPM
yLimits = 60, 90 ; MAP
zLimits = 10, 200 ; VE

; Controller parameters
initialStartupInterval = 1.0 ; seconds
updateInterval = 1.0 ; seconds
proportionalGain = 0.5
lumpiness = 5 ; percent
To make auto-tune work with earlier versions of MSnS-E (which require a INI file written before auto-tune was implemented) you'll need to use an old settings.ini and custom.ini, but cut the [AutoTune] section out of the new MT carMtCfg/custom.ini and paste it into your old one. Once you do this, you should scan your audit.log in the car1 directory to make sure that you are reading the old files an no new ones from the MT directories, as these might mess things up.
This window enables you to tune the AFR table 'on the fly' if you have the wide band sensor option selected. On the left are a number of gauges, and on the right are two items - a graphical representation of the AFR table at the top, and a status box at the bottom.
Cursor
The "cursor" is the red cross on the tuning RPM vs MAP graph on
the right half of the screen. The values corresponding to the current
cursor position are displayed in the status window in the same color as
the cursor. These represent the values that will be changed when the
shift-up/down arrows are pressed.
Spot
The "spot" is the green dot specifying current engine operating
position in the VE graph. The numeric values corresponding to the spot are
displayed in green in the status window.
Keystrokes
To navigate the AFR map on the right of the Tuning screen, use the arrow keys move the tuning cursor, up moves up on the MAP axis of the grid and down moves to a lower MAP bin. If you know VI, then you can alternatively use the standard motion keys from that editor; use "k" to go up, "j" to go down, "h" to go left and "l" to go right. Left and right arrow keys move to the higher and lower RPM bins, respectively.
The shifted down and up arrow keys richen or lean the AFR table bin at the cursor. Alternatively, the "w" key richens the currently selected bin and "q" leans it. Whenever you change a value in MegaTune/TunderStudioMS, it is immediately changed in the MegaSquirt® controller's RAM. These changes will go away when you turn off the engine if you do not save them into flash memory by typing "b" for "burn to flash."
Note that the AFR gauge on the left is showing you the current AFR of the exhaust gases according to the wideband feedback (and assuming it is set up correctly, etc.).
The green lettering is showing you the table value at the current conditions. That is, it is showing you the target AFR. The gauge will only match this if the EGO correction is enabled and has sufficient range to get to the target level. Since you have the authority set to zero, you wouldn't expect them to agree.
The red lettering is showing you the AFR from the table at the currently selected table position (i.e. the AFR of the table target value as you move around the 12x12 table). This is the table's target AFR value that will be adjusted if you choose to do that. It will be the same as the green value if the cursor is moved to the current operating conditions.
So the gauge is showing you what you are getting, the green is showing what you are aiming for, and the red is showing you what you will change if you use the shift-up or shift-down arrow keys.
You can rotate the grid so you can see the values better on the 3D window more clearly. Hit the "m" and "n" keys and see what happens. Once you find an orientation you like, copy down the numbers that are displayed in the status window and you can set those as your defaults in the base ini file:
gridOrient = 250, 0, 340 ; Spatial rotation of 3-D table graphical view grid in degrees.
This window enables you to tune the MS-II™ AFR table 'on the fly' if you have the wide band sensor option and the dual table mode selected. On the left are a number of gauges, and on the right are two items - a graphical representation of the AFR table at the top, and a status box at the bottom.
Cursor
The "cursor" is the red cross on the tuning RPM vs MAP graph on the right half of the screen. The values corresponding to the current cursor position are displayed in the status window in the same color as the cursor. These represent the values that will be changed when the shift-up/down arrows are pressed.
Spot
The "spot" is the green dot specifying current engine operating position in the VE graph. The numeric values corresponding to the spot are displayed in green in the status window.
Keystrokes
To navigate the AFR map on the right of the Tuning screen, use the arrow keys move the tuning cursor, up moves up on the MAP axis of the grid and down moves to a lower MAP bin. If you know VI, then you can alternatively use the standard motion keys from that editor; use "k" to go up, "j" to go down, "h" to go left and "l" to go right. Left and right arrow keys move to the higher and lower RPM bins, respectively.
The shifted down and up arrow keys richen or lean the AFR table bin at the cursor. Alternatively, the "w" key richens the currently selected bin and "q" leans it. Whenever you change a value in MegaTune, it is immediately changed in the MegaSquirt® controller's RAM. These changes will go away when you turn off the engine if you do not save them into flash memory by typing "b" for "burn to flash". TunerStudioMS gives you the option of whether the values are burned to flash immediately or not.
You can rotate the grid so you can see the values better on the 3D window more clearly. Hit the "m" and "n" keys and see what happens. Once you find an orientation you like, copy down the numbers that are displayed in the status window and you can set those as your defaults in the base ini file:
gridOrient = 250, 0, 340 ; Space 123 rotation of grid in degrees.
This window enables you to tune the MS-II ignition advance table 'on the fly'. On the left are a number of gauges, and on the right are two items - a graphical representation of the advance table at the top, and a status box at the bottom.
Cursor
The "cursor" is the red cross on the tuning RPM vs MAP graph on
the right half of the screen. The values corresponding to the current
cursor position are displayed in the status window in the same color as
the cursor. These represent the values that will be changed when the
shift-up/down arrows are pressed.
Spot
The "spot" is the green dot specifying current engine operating
position in the VE graph. The numeric values corresponding to the spot are
displayed in green in the status window.
Keystrokes
To navigate the spark advance map on the right of the Tuning screen, use the arrow keys move the tuning cursor, up moves up on the MAP axis of the grid and down moves to a lower MAP bin. If you know VI, then you can alternatively use the standard motion keys from that editor; use "k" to go up, "j" to go down, "h" to go left and "l" to go right. Left and right arrow keys move to the higher and lower RPM bins, respectively.
The shifted down and up arrow keys increase or decrease the advance in the ignition table bin at the cursor. Alternatively, the "w" key richens the currently selected bin and "q" leans it. Whenever you change a value in MegaTune, it is immediately changed in the MegaSquirt® controller's RAM. These changes will go away when you turn off the engine if you do not save them into flash memory by typing "b" for "burn to flash."
You can rotate the grid so you can see the values better on the 3D window more clearly. Hit the "m" and "n" keys and see what happens. Once you find an orientation you like, copy down the numbers that are displayed in the status window and you can set those as your defaults in the base ini file:
gridOrient = 250, 0, 340 ; Space 123 rotation of grid in degrees.
In general, you want:
To set the spark advance table, you should try to understand what your engine needs in the following areas:
So the ECU uses the TPS to look up the MAP in the 6x6 table (which should have TPS% ranging from 0% to 100%), then uses that to determine the fuelling based on the VE table. The advantage is that you can use different fuelling at different rpms (it also makes the blended MAP/alpha-N options possible).
If you want basic alpha-N with the fuel dependent only on throttle position, just make the 6x6 tables equal the TPS% all the way across each row. Note that the default values might not be appropriate (they may be used to store other variables in some cases).
In this dialog you can set the warm-up enrichment (WUE) bin values and a few other related settings. The WUE bins are used to provide additional fuel during warmup, much like a 'choke' on a carburetor. A WUE value of 100 means no enrichment. Typically values are 100% at the highest temperature (usually 160°F) and increase up to around 160 or more by -40°F. Setting a warmup enrichment bin to 100 (usually the last one, but you can set it to 100% at other bins too) disables the warm-up enrichment. You can edit the temperature bins themselves, as well (see this).
Some things to be aware of:
You can still use the wizard, but you will have to reference the bar graph 'thermometer', rather than the values to the left of the pink WUE percent values (the arrow and pink WUE bin will point to the current warmup enrichment percentage, the current temperature is on the bar graph labeled 'Coolant').
Some alternatives are to return to the default values for the temperature bins, or use TunerStudio.
Acceleration enrichment (AE) occurs when you open the throttle "rapidly" to avoid bogging the engine. In v.1.01 MegaSquirt® EFI Controller, this is done solely based upon the rate of change in the throttle position sensor (also called TPSDOT).
MegaSquirt-II allows this acceleration enrichment to be triggered by a change in the TPS (TPSdot) or a change in the MAP (MAPdot) or any combination of the two.
The MAPdot settings are on the left side of the accel wizard, and the TPSdot settings are on the right. Each column of 4 bins allows you to specify the rate of MAPdot or TPSdot, and in the corresponding bin (to it's right) you can specify the amount of fuel (in milliseconds per injection) that should be added to the pulse width calculated based ont he MAP, rpm, etc.
Acceleration Enrichment
Bins (ms)
These bins specify the actual
enrichment in terms of pulse width. They are linearly interpolated to
determine a value that is ultimately added to the computed pulse width.
The array of values is called "TPSAQ" as
stored in MegaSquirt. Note that with MegaSquirt-II, you have two sets of
bins, one for TPS based acceleration enrichment, and the other for MAP
based acceleration enrichment.
You can use the slider to choose between the TPSdot and MAPdot accel enrichments. Move it to the left to select more MAPdot accel enrichment, and to the right for more TPSdot enrichment.
Below the accel bins are a number of other settings:
MAPdot Threshold
This is the threshold in kpa/sec below which no
acceleration enrichment will occur (you can move the throttle from idle to
full open without acceleration enrichment, if you open it slowly enough).
A typical value is 80 kPa/sec. Tuning Note: While you are tuning the VE table you should set this
threshold artificially high (maybe 150.0) to disable acceleration
enrichment completely. After the VE table is fairly well-defined, set this
back to 80 and begin tuning AE.
TPSdot Threshold
This is the threshold in %/sec (v/sec in some older code versions) below which no
acceleration enrichment will occur (you can move the throttle from idle to
full open without acceleration enrichment, if you open it slowly enough).
A typical value is 15%/sec.
Note the some v2.8 (& 2.6) INIs prior to Dec. 2007 have an error is in the TPSdot threshold setting. The error manifests itself as displaying the values as 1/10th the actual setting (so for example, 12.3 %/sec in MT would actually be 123 %/sec in the MS-II controller). You can tell if you have this error by looking at the TPSdot threshold in the accel enrichment wizard. If you have a decimal value displayed, then you are actually setting the value to 10x the shown value. You can either live with that by taking it into account, or put the appropriate updated INI in your project /mtCfg/ folder, and remaining it to megasquirt-II.ini (i.e., remove the numbers and periods at the end). The updated INI files are here:
The change is to: