 |
| |
The operation of the UEGO sensor basically requires reading the instantaneous Nernst generated voltage, and providing oxygen pump current which will bring the Nernst cell voltage to a target value (around 0.45 volts). Many systems employ an analog system that adjusts the pump current in a feedback loop. Often, a PID (Proportional-Integral-Differential) control loop is used, with the proportional part relating to how far off the Nernst cell voltage is from the target 0.45 volts, the integral part is used to compensate for the lag and the offset in the pump cell, and the differential part used to control the ramping of the pump based on the rate of change of Nernst response.
An analog solution works well, but it is “tuned” for a particular response of a sensor. Different sensor manufacturers have different feedback response (transfer function), so to change sensor head type would require hardware PID loop changes. Another implementation method is to provide digital pump control, where the analog voltage of the Nernst cell is digitized and manipulated in software, and a reverse operation (DAC) used to control the pump voltage (and hence current).
Using software to maintain the feedback loop opens up an exciting chance to experiment with different control algorithms. Since this is an experimental wideband controller, making the loops in software will allow the implementation of different feedback techniques. A few that come to mind are:
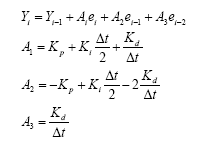
Yi = Current pump voltage output,
Yi-1 = Previous pump voltage,
ei = Current error of Nernst cell reading from the target 0.45 volts,
Kp = Proportional PID term,
Ki = Integral PID term,
Kd = Derivative term.
This form of the PID control loop is optimum for a DSP, which is designed to perform multiply/accumulate operations in a single clock cycle. Also note that the terms A1, A2, and A3 are generated only once (unless the PID parameters change), so the only real calculation is the recursive relation with Yi.
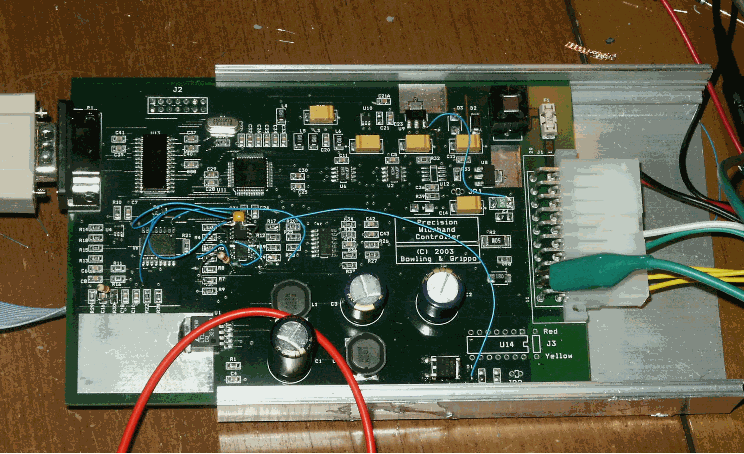
The heart of the system is the Motorola 56F8323 digital signal processor (DSP)/controller. This is a 16-bit fixed-point DSP operating at 64 MIPs with a plethora of on-board peripherals, and it operates over the automotive temperature range (-40°C to +120°C).
In the last few years, digital signal processor hybrid microcontrollers have hit the market. Simply put, they combine the best features of a digital signal processor (DSP) and microcontroller. The features include things such as multiply-accumulate operations, extended precision math, bit operation, and good on-board peripheral sets. And the cost for these devices is very, very low.
Many manufacturers offer these devices, including Texas Instruments (TMS320C28x) and Microchip (dsPIC). Motorola has offered the DSP56F80x family for some years, and have just recently came out with the 56F83xx family – this is the device which was chosen for the Precision Wideband Controller. The onboard 12-bit ADC and the free compiler is enough to sway anybody, let alone the other rich mix of peripherals and on-board flash memory – and, by the way, 64 MIPS!
One could have used a simple 8-bit Microcontroller for this application, but after all of the math (if one implements it) it would be simply exhausted. The hybrid DSP is literally two dollars more, and has plenty of horsepower for the calculations. This is the 21st century – enough of trying to squeeze code into 1K of memory and instituting massive lookup tables because the part cannot do a simple division without chewing massive clock cycles.
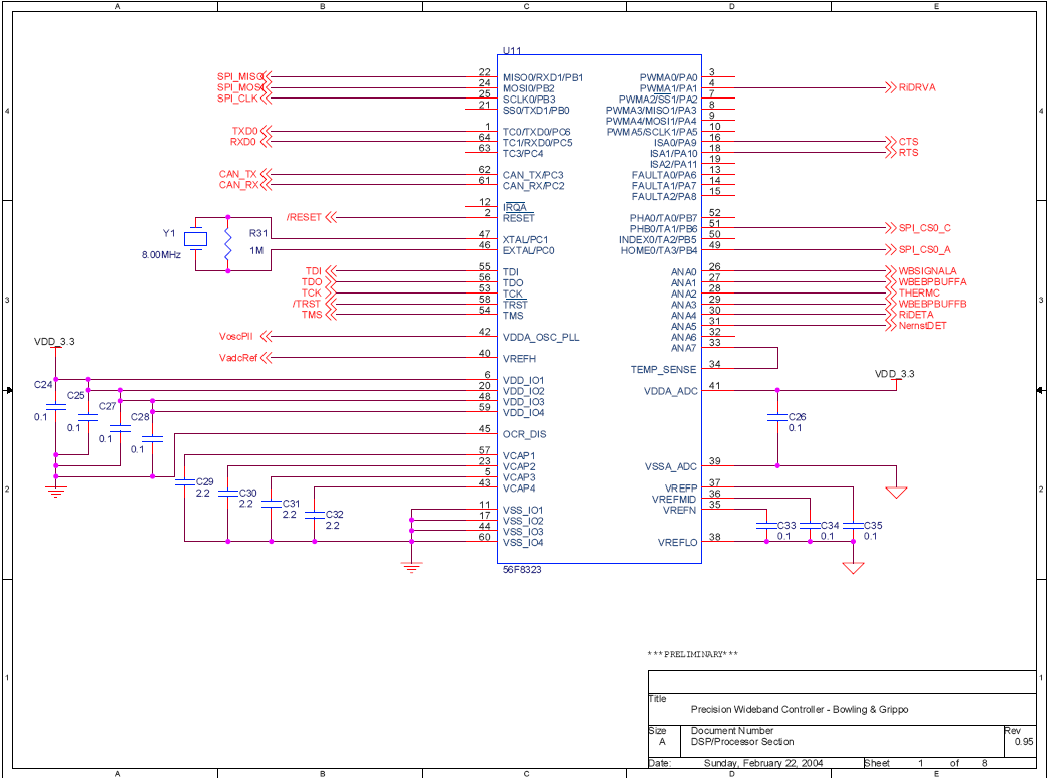
The 56F8323, a member of the 56800E core-based family of hybrid controllers, combines the processing power of a DSP and the functionality of a microcontroller. Inside a compact 64-pin LQFP, along with 48 KB of on-chip Flash memory and a comprehensive set of peripherals. It extends the capabilities of the 56F8322 by adding additional analog-to-digital converter (ADC) inputs, and timer input/output pins, among other enhancements.
The DSP has the usual collection of items like decoupling capacitors, crystals, etc. This DSP also has a JTAG emulator connection, allowing in-circuit board development. Core and I/O voltage is 3.3 volts. Other nifty items are an on-board 12-bit ADC, CAN, SCI, and SPI. And, there are free C compilers and debugger tools available for this device.
The 56F8323 Digital Signal Processor uses a mathematical approach to generating AFR values (instead of table lookup), so there is a significant processor performance metric with a lot of "multiply-accumulate" calculations.
The 56F8323 control DSP (running at 60 MIPs) has turned out to be quite a bullet proof beast. Bruce has tortured it with overvoltage, shorts (all accidental) and it never dies. And the current source code is still within the "free" Metrowerks compiler code size (but this could change with the addition of some more of the CAN communications function and additional math computations).
There are more details on the 56F8323 here:
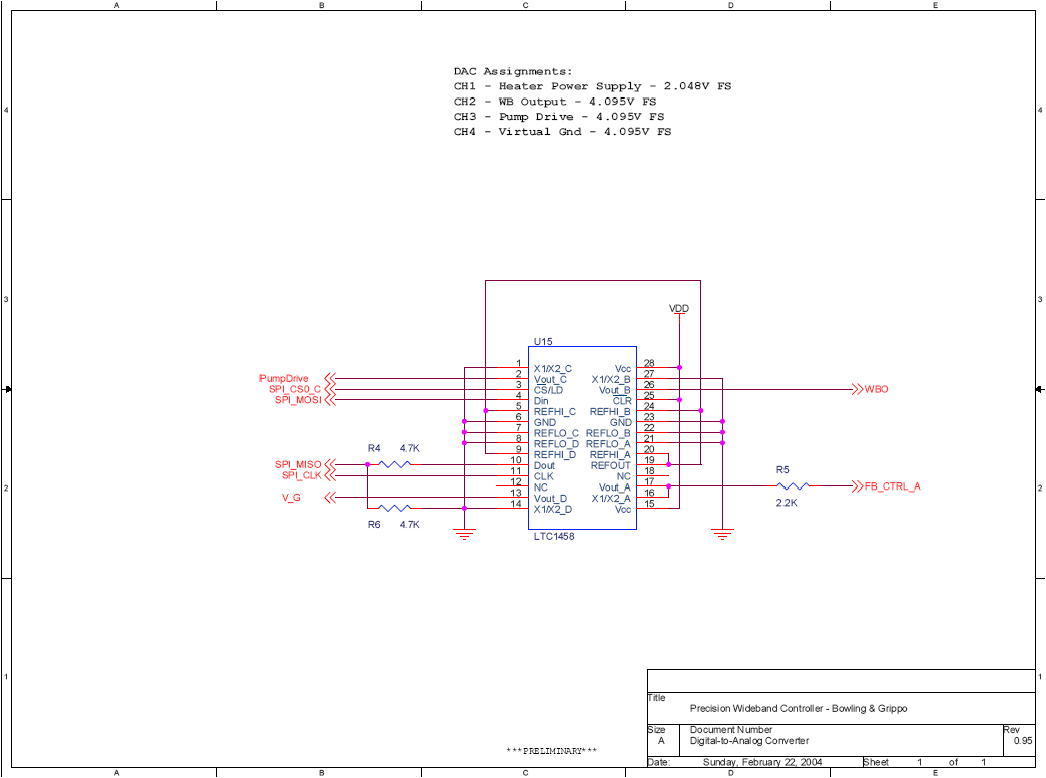
Next in line is the 4-channel digital-to-analog converter (DAC), the Linear Tech LTC1458. This DAC communicates wih the DSP using a standard SPI interface. The four channels each are assigned a function:
The DAC is a 5-volt device, but its logic 1 threshold is 2.5 volts, hence the DSP can drive the DAC to a logic 1 level using 3.3V. For the “other” direction (MISO), a pair of resistors form a voltage divider. By setting the DAC voltage values one can obtain a (theoretical)  5V voltage across the actual pump, and hence a current based on series resistance and internal cell impedance (subtracting off pump polarization). A thing to remember is that the Nernst cell output is also referenced by the virtual ground.
The general implementation of the pump circuit is to simply bias the pump/Nernst return to a mid-point voltage. For example, for a circuit using 5 volts for full swing, a mid-point bias of 2.5 volts or thereabouts is often used – this mid-point bias is applied to the Nernst/pump return. Therefore, the pump control voltage (feedback) can range to a theoretical -2.5V to +2.5 volts (if the bias is chosen to be 2.5 volts). This control voltage generates a current flow in the pump.
Lets take a look at the equation for pump voltage around the loop:

Where:
Rsense is the sense resistor for detecting pump current,
Rseries is all other series resistances in the pump loop. For instance, small values of series resistance is often added to unity-gain op-amp drives (i.e. wide bandwidth op-amps) in order to prevent oscillation,
Ipump = Pump current,
Vp = “Polarizing Voltage” of the pump cell – this is a voltage needed to polarize the pump cell in order to source or sink oxygen. Nominal values for Vp are +450 mV for oxygen sink and –350 mV for oxygen source.
So, the pump drive has to first overcome the polarization effect of the pump cell, then its current will be dictated by the series resistance and the applied pump potential (Vpump_loop_voltage). Using extreme values for Rsense and Rseries, and the fact that op-amps typically do not drive at full current when they are very close to the supply rails (i.e. Vsat saturation voltage, typically around 100 to 200 mV depending on op-amp operating temperature and type.) one can determine “comfortable” values of pump current of 10 mA.
This range is sufficient for many applications – however, for boosted operation (i.e. turbo/supercharger applications) the (possible) increased exhaust back pressure leads to a decrease in sensor response – this implies that more pump current is needed to achieve the same sensor reading.
In order to ensure that sufficient pump current is available for all operating conditions and sensor applications, the voltage of the mid-point (Nernst/pump return) is set by a voltage DAC (Digital-to-Analog Converter). The pump voltage terminal is driven by another DAC channel. So, with this arrangement, it is possible to apply close to 5 volts across the pump – but in practical setups a range of 4 volts is possible.
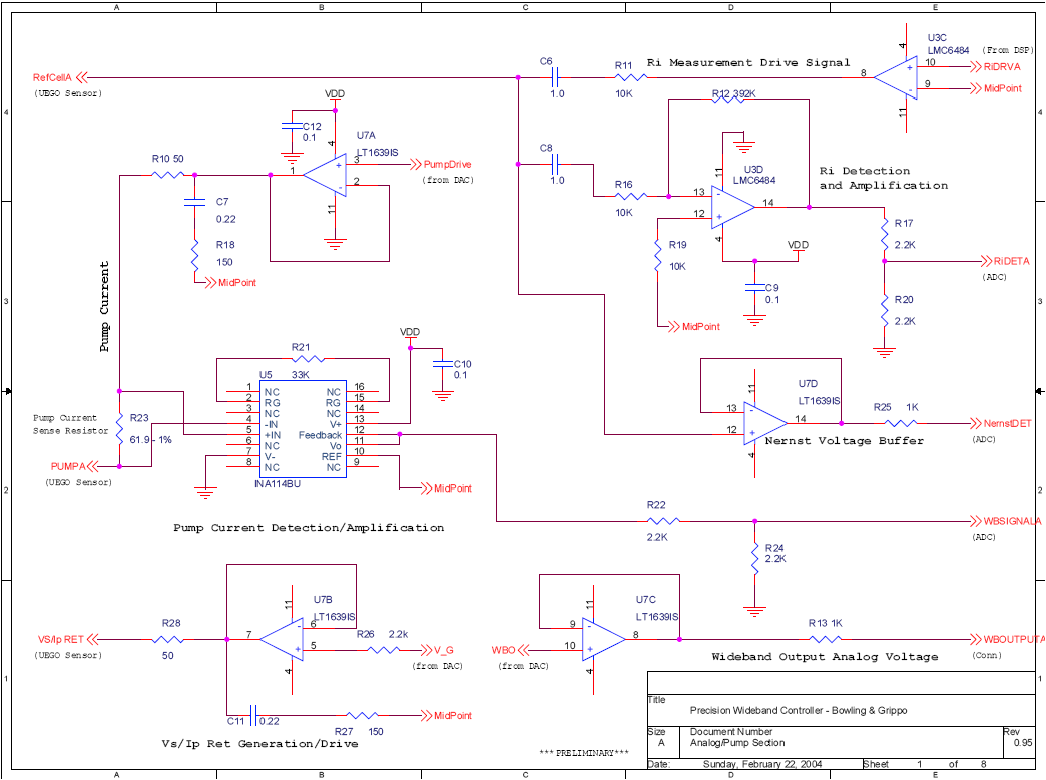
Note that the 4 volt range can be obtained by using a 8-volt source and a 4-volt mid-point bias (like in the DIY-WB circuit). But, by using two DACs under software control, the same range can be achieved with only a 5 volt supply.
In addition, having a “moveable” mid-point reference has an additional benefit. For measuring pump current, the voltage across resistor Rsense is detected by the INA114 instrumentation amplifier. It is a well known fact that best common-mode rejection is obtained when the input bias currents are very close – this occurs when the voltage difference across the Rsense resistor is equidistant to the instrumentation amplifier mid-point potential (think symmetry in the circuit). In this circuit, the mid-point potential for the INA114 is 2.5 volts – so it is desirable to adjust the two DAC values such that the actual voltage on one side of Rsense and the other side of Rsense are the same delta from the 2.5 volt bias.
There are more details on the LTC1458 DAC here:
Next is the actual sensor control. For pump and virtual ground drive, a Linear Tech LT1639 is used for both its drive current capabilities (rail-to-rail) and its capability of driving large capacitive loads. For the actual pump current detection circuit, a precision instrumentation amplifier from Burr-Brown (now Texas Instruments), the INA114 is used. This device has a superior common-mode rejection ratio, something really required in a noisy environment. The output of the INA114 is presented to the ADC in the DSPTo measure the resistance of the Nernst cell (for heater regulation), a 3 KHz squarewave is coupled via a capacitor, and its response is also capacitor-coupled and amplified, forming a synchronous rectifier. The actual DC level of the Nernst cell is buffered by an op-amp and introduced into the DSP.
The INA114 is a low cost, general purpose instrumentation amplifier offering excellent accuracy. Its versatile 3-Op Amp design and small size make it ideal for a wide range of applications. A single external resistor sets any gain from 1 to 10,000. Internal input protection can withstand up to ±40V without damage.
The INA114 is laser trimmed for very low offset voltage (50µV), drift (0.25µV/°C) and high common-mode rejection (115dB at G = 1000).
Bruce has tested the CMRR (common-mode rejection) of the INA114 instrumentation amplifier and it is quite good. He hopes to have specific in-circuit numbers real soon, this depends on final pump drive configuration and the whole feedback loop.
There are more details on this part here:
The general implementation of the pump circuit is to simply bias the pump/Nernst return to a mid-point voltage. For example, for a circuit using 5 volts for full swing, a mid-point bias of 2.5 volts or thereabouts is often used – this mid-point bias is applied to the Nernst/pump return. Therefore, the pump control voltage (feedback) can range to a theoretical -2.5V to +2.5 volts (if the bias is chosen to be 2.5 volts). This control voltage generates a current flow in the pump.
Lets take a look at the equation for pump voltage around the loop:
Where:
Rsense is the sense resistor for detecting pump current,
Rseries is all other series resistances in the pump loop. For instance, small values of series resistance is often added to unity-gain op-amp drives (i.e. wide bandwidth op-amps) in order to prevent oscillation,
Ipump = Pump current,
Vp = “Polarizing Voltage” of the pump cell – this is a voltage needed to polarize the pump cell in order to source or sink oxygen. Nominal values for Vp are +450 mV for oxygen sink and –350 mV for oxygen source.
So, the pump drive has to first overcome the polarization effect of the pump cell, then its current will be dictated by the series resistance and the applied pump potential (Vpump_loop_voltage). Using extreme values for Rsense and Rseries, and the fact that op-amps typically do not drive at full current when they are very close to the supply rails (i.e. Vsat saturation voltage, typically around 100 to 200 mV depending on op-amp operating temperature and type.) one can determine “comfortable” values of pump current of 10 mA.
This range is sufficient for many applications – however, for boosted operation (i.e. turbo/supercharger applications) the (possible) increased exhaust back pressure leads to a decrease in sensor response – this implies that more pump current is needed to achieve the same sensor reading.
In order to ensure that sufficient pump current is available for all operating conditions and sensor applications, the voltage of the mid-point (Nernst/pump return) is set by a voltage DAC (Digital-to-Analog Converter). The pump voltage terminal is driven by another DAC channel. So, with this arrangement, it is possible to apply close to 5 volts across the pump – but in practical setups a range of 4 volts is possible.
Note that the 4 volt range can be obtained by using a 8-volt source and a 4-volt mid-point bias (like in the DIY-WB circuit). But, by using two DACs under software control, the same range can be achieved with only a 5 volt supply.
In addition, having a “moveable” mid-point reference has an additional benefit. For measuring pump current, the voltage across resistor Rsense is detected by the INA114 instrumentation amplifier. It is a well known fact that best common-mode rejection is obtained when the input bias currents are very close – this occurs when the voltage difference across the Rsense resistor is equidistant to the instrumentation amplifier mid-point potential (think symmetry in the circuit). In this circuit, the mid-point potential for the INA114 is 2.5 volts – so it is desirable to adjust the two DAC values such that the actual voltage on one side of Rsense and the other side of Rsense are the same delta from the 2.5 volt bias.
The next part is the heater control. This is accomplished using a Linear Tech LT1170 switcher configured in a SEPIC topology. This switcher circuit is capable of providing up to 4 amps of continuous power, and the voltage is adjustable by the DSP from 5 to 16 volts – this range is independent of the vehicle’s electrical voltage.
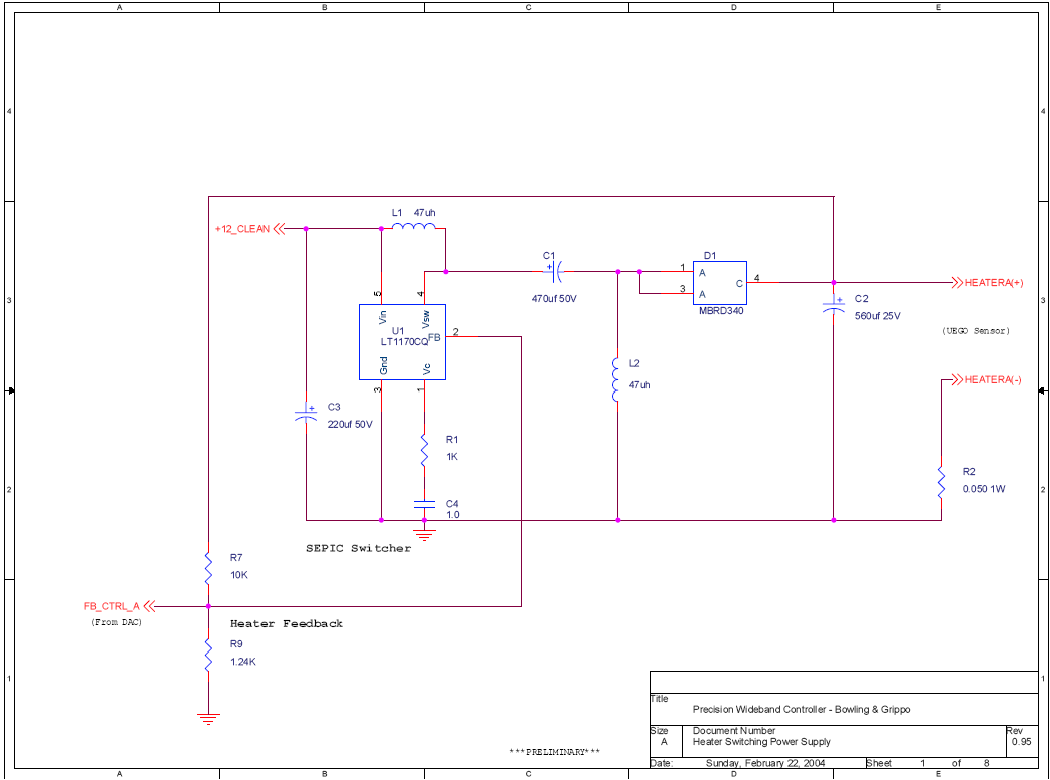
The topology of the switch mode power supply for the heater is known as SEPIC (single-ended primary inductance converter). The advantage of this topology over other options, such as a buck-boost, is that the output is the same polarity as the input (a buck-boost inverts the output). Maintaining a positive reference with respect to ground makes functions like current measurement easier. The output voltage can be higher or lower than the input voltage, and in this circuit the voltage is set by the DSP (more below). Hence, the heater voltage can be set from a range of 6 volts to 16 volts and does not depend on the input voltage. With this, the heater can be controlled in a direct and repeatable manner.
Perhaps the most critical aspect of control of the wideband sensor lies in maintaining a known and constant sensor temperature. The transfer curve of the Nernst cell and oxygen pump operation is very temperature dependent. What this implies is that for a given pump current required (in order to maintain a balanced Nernst cell/oxygen pump equilibrium) will change as a function of temperature.
In order to maintain a valid calibration of Nernst response, either the cell must be maintained at a constant temperature or a calibration adjustment, which is a function of temperature, must be applied in order to correct for temperature offsets (or a combination of both). This is imperative if one wants to obtain consistent and comparable results over all operational conditions. Remember, any wideband circuit will give you a number, but in order for it to be consistent the operational temperature of the sensor head must be constant.
So, just turn on the heater and let it be! Its not that simple. Consider a few real-world scenarios:
Scenario #1: You need to merge onto a freeway and there is very short acceleration lane. So, you punch the pedal to the floor and the engine roars to a high RPM while you merge onto the freeway. During this time, there is an increase of exhaust gas flowing across the sensor head, both rate and temperature. So, the sensor will heat up during this time due to thermal transfer from the exhaust gas to the sensor. But, if the sensor heats up, then the Nernst response function will change, as will its transient response. So, we need to determine the temperature of the sensor head and correct the oxygen pump current signal. Better yet, if the sensor's heater was throttled back during this time, then it is possible to maintain a small temperature deviation just by constantly monitoring the sensor temperature and adjusting the heater's applied voltage and/or current. Since the heater's impedance is for the most part constant during warmed-up operation, adjusting the voltage will in fact control the heat output (energy). So, one just simply reads the sensor temperature and if there is ever an increase in temperature throttle back the heater, and vice-versa.
A method used by many wideband controllers for control of the heater is by the use of Pulse Width Modulation (PWM). What this does is quickly turn on and off the heater (at hundreds to thousands of times per second). The ratio of on-time to the overall PWM period determines the amount of average heat applied to the heater, and is usually expressed in percent. So, a 90% PWM means that the heater voltage will run at 90% of the current battery voltage. PWM waveforms are easy to generate with a microprocessor - just feed a PWM signal to a transistor or FET switch and have this control the heater.
Problem solved. - Or, is it??? Consider the following:
Scenario #2: It has been snowing outside, and all of the roads are blocked with snow and ice. You are stuck in a very slow moving mass of traffic, just barely crawling. It's bitter cold outside, so you have the heater cranked up full blast. It's dark and hard to see so you have the head lights on. And the snow keeps on coming, so the windshield wipers are flailing away at full bore. The engine is pretty much at idle as you crawl at a snail's pace. You really hate winter! And, so does your vehicle’s electrical system…
While all this is going on, what do you think your vehicle's battery voltage is? If you are lucky it is in the 13 volt range or so, but bets are it may be running lower, like in the 11 to 12 volt range. Your alternator (with the engine at idle) is trying its best to keep the power needs of the wipers, head lights, heater motor, and to maintain a decent change on the battery, which may be quite low right now because you had to crank and crank a few minutes back due to the bitter cold temperature.
As you crawl along, you experience a few puddles of icy water muck which splash up under the vehicle - this hits the exhaust system at various places and cools the tubing and anything screwed into it (like a sensor) in nice extreme temperature jolts.
So, we have low battery voltage, an engine at idle not producing much exhaust flow (i.e. heat), and water splashing about causing all sorts of temperature gradients in the exhaust. We can clearly see that the sensor's heater voltage needs to be pretty maxed out in order to maintain a target operating temperature. So, the PWM is cranked up by the microprocessor to maximum - 100%. But, we have a low vehicular voltage, in the 11 to 12 volt range, or less. If the heater PWM switch element is a FET, then it should only drop a few tenths of a volt (Rds of the FET) with the rest being applied to the heater. If the heater switch control element was something like a Darlington transistor (ie.e TIP120 or similar), then life is much worse, in that a saturated Darlington collector-emitter has a voltage drop of roughly 2 volts - this means that out of our 11 volts of battery, we just threw away 2 volts in the transistor as heat, leaving 9 volts for the heater!
One will find that the target operating voltage for the sensor like the LSU wideband is something around 10.0 - 11.5 volts (this is sensor specific). You can do the math.
Now, the question of the day: what if 100% duty cycle at our vehicle's voltage is not enough to bring the heater up to temperature? If not then we have to run the sensor off of the desired temperature target. In this case, we had better make sure the temperature interpolation values for pump current is correct. [By the way, do you hear of any of the other wideband sensor controllers out there discuss pump current correction for off-temperature operation?]. Additionally, the Nernst response will also suffer.
Now, like in the movie "This is Spinal Tap", wouldn't it be nice if we could turn up the heater voltage, like they desired with their guitar amplifiers? With the Precision Wideband’s heater circuit we can do exactly that, just like Spinal Tap's "When ten is not loud enough, we can turn our amps up to eleven".
The Precision Wideband uses a switch mode power supply to control the heater, using a topology known as SEPIC (single-ended primary inductance converter). This power supply is capable of maintaining the voltage at a specified voltage regardless of the vehicular voltage – even if the vehicle’s voltage drops to a level of 7 volts, the heater will be maintained at the required higher voltage of 10 – 12 volts. The voltage is set by the DSP and is corrected in real time (i.e. at a rate of 100 times per second - real-time for the lag time of the heater) based on measured sensor temperature.
The fixed-voltage LT1170 Switcher is adjustable by the DSP. It is pretty much bullet proof. The LT1170 handles input power overvoltage to 40 volts, reverse battery, and the output can be shorted indefinitely without damage. Since the switcher can provide over 4 amps continuous, this is a good feature indeed!
It turns out that the LT1170, like many switchers, use a resistor divider to tap off of the output voltage, and use this as a feedback to adjust the output (voltage feedback). The junction of these two resistors want to be at 1.24 volts – if this junction is higher then the switcher adjust the PWM duty cycle to lower the output voltage, and vice-versa. The resistors values chosen yield approximately 12 volts in the switcher output.
Now, if one introduces a current in this junction, they can alter the steady-state point. This is done with one of the DAC channels and a series resistance. Now, by adjusting the DAC voltage, the steady-state point will be moved and the switcher will then compensate by either increasing or decreasing the output.
This setup works exceedingly well. Heater voltage response to DAC set point changes are well within the bandwidth required for real-time heater control.
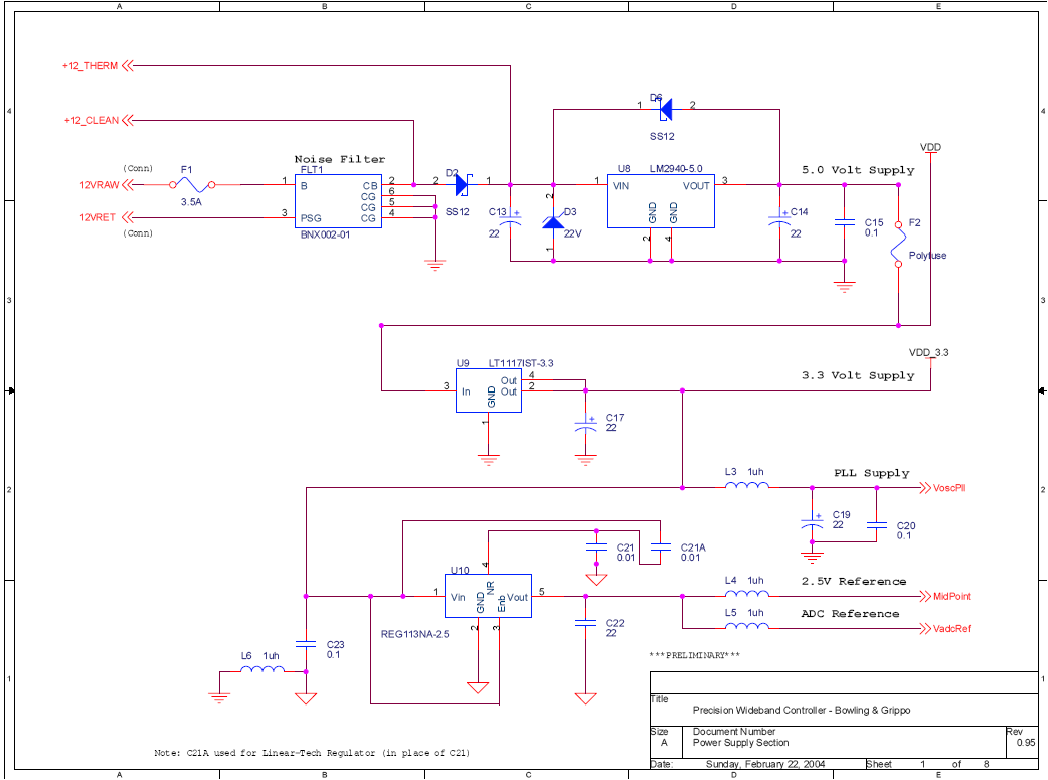
The power supply consists of a Murata BNX002 noise filter on the power input. Due to low power consumption in the circuit, standard linear regulators are used for the 5.0 and 3.3 volt supplies. A precision voltage reference (REG113NA) is used to generate the mid-point voltage of 2.5 volts – this is also used as the reference of the ADC.
The input for the exhaust backpressure sensor is buffered by a National LMC6484 op-amp. A complete thermocouple amplifier and cold-junction compensation is provided by the Analog Devices AD595. The thermocouple is used to monitor exhaust temperature in order to determine the water-gas equilibrium.

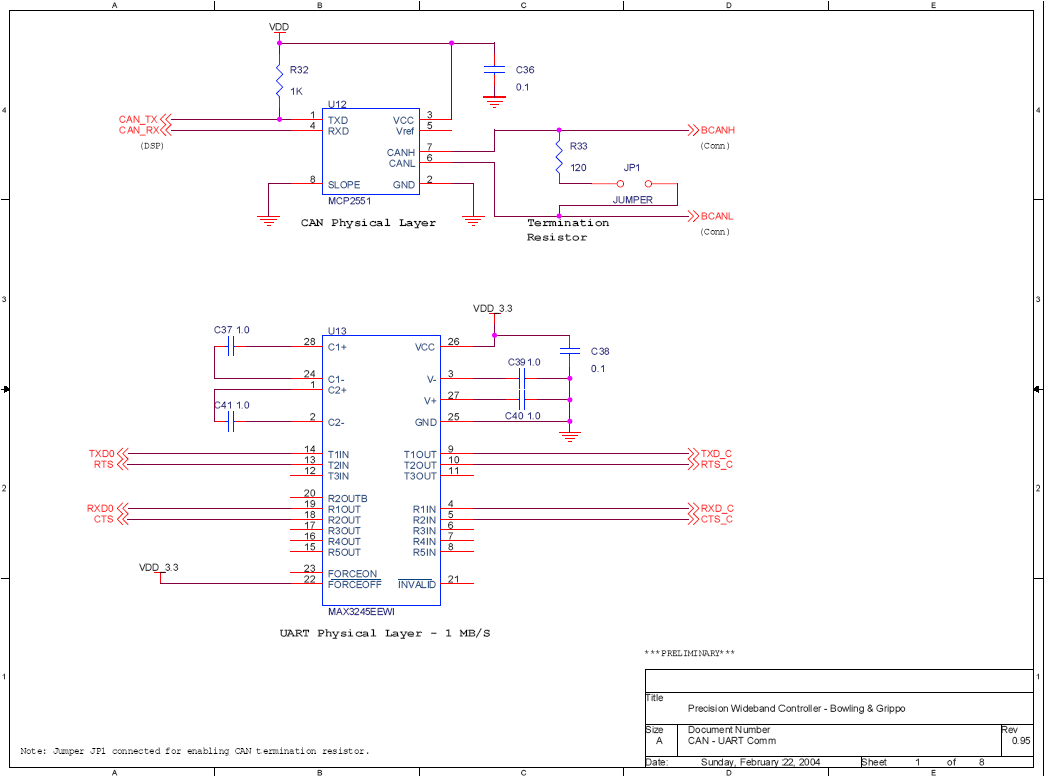
CAN Bus and Serial Communication
The physical layer CAN transceiver is the Microchip MC2551, and there is a jumper-selectable termination resistor. The UART physical layer driver is the MAX3245, which can operate at up to 1 mbit/sec for extremely fast UART communication.
CAN, or Controller-Area-Network, is a serial networking protocol which was designed by Bosch for use in automotive environments. CAN offers a robust and easy to use networking infrastructure.
Why does the Precision Wideband Controller need a network like CAN? In the implementation of the controller, the use of an analytical method of determination of lambda ( ) means that it is possible to let the controller know if there is a change in hydrocarbon.
For example, when injecting nitrous, the chemical balance with respect to the hydrocarbon ratios are altered – this will lead to inaccurate calculation of lambda unless it is accounted for. The integration will provide information back to the Precision Wideband Controller (using CAN) on any hydrocarbon change, in real-time.
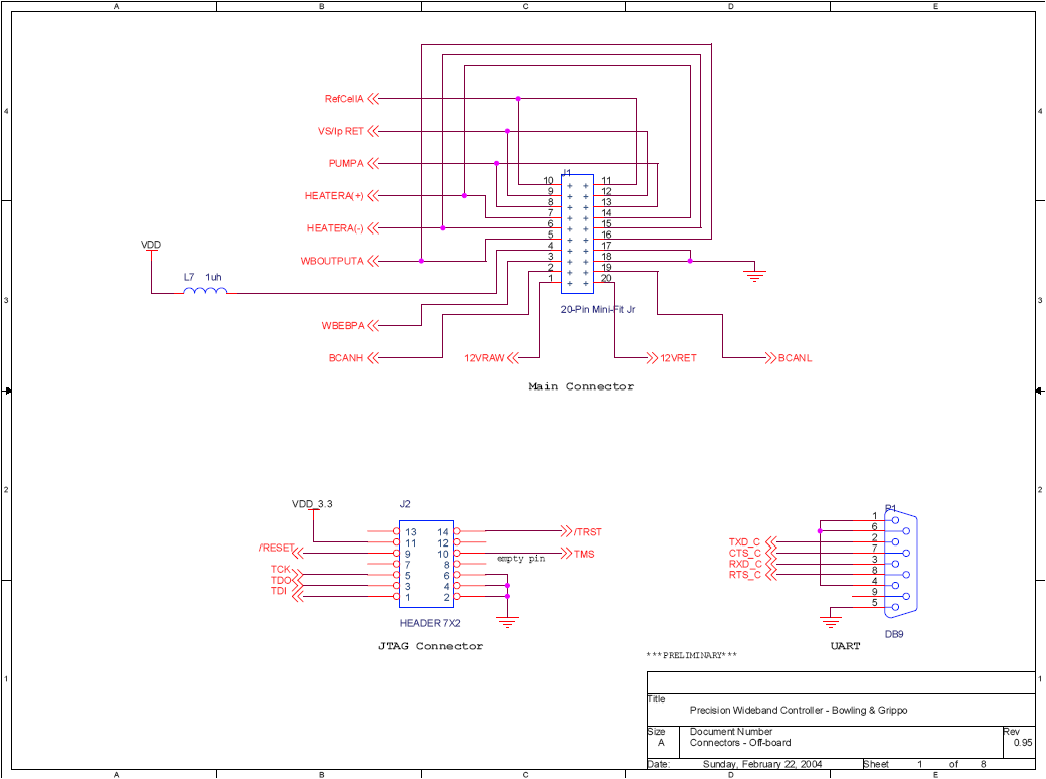
Connectors
The Precision Wideband Controller has three connectors:
* We dedicate the Precision Wideband Controller to the memory of Garfield Willis. Garfield was instrumental in early research and development of the EGOR wideband controller.